• Skip to primary navigation
  • Skip to main content
  • Skip to primary sidebar
  • Skip to footer

The Interiors Addict

Heart Your Home

@interiorsaddict on Instagram   @interiorsaddict on Facebook   @interiorsaddict on Pinterest  
Subscribe
  • Job Board
  • About
  • Before & Afters
  • RENO ADDICT
  • Kitchens
  • Bathrooms
  • Kids Rooms
  • Bedrooms
  • Living Room
  • Shopping
  • Expert Tips
  • Recipes
  • Parenting
  • Travel
Interiors Addict
  • Job Board
  • About
    • Our Story

      Australia’s largest interior design, styling and renovation blog for the everyday Aussie. By former journalist and magazine editor Jen Bishop, the original interiors addict!
      READ MORE

      We’re big on Instagram!
      @interiorsaddict

      • About
      • Contact Interiors Addict
      • Work with Interiors Addict
      • Advertise / Find a job in Interiors
      • Press
    • Get Your Free Ebook

      This field is for validation purposes and should be left unchanged.
    • bookcover-jens-reno
  • By Room
    • Browse by Room

      Where you can search for all our posts about a specific room. Only interested in kitchens and bathrooms? We got you!

      • Kitchens
      • Bathrooms
      • Kids Rooms
      • Bedrooms
      • Living Room
      • Home Office
      • Dining
      • Laundry
      • Outdoor & Exteriors
      • Renting
    • bookcover-jens-reno
  • Before & Afters
    • Before & Afters

      Who doesn’t LOVE a good before & after? If you want to be inspired by the whole reno process, and not just the shiny photos at the end, this is the place for you!

      View Articles

      • Before & Afters
      • Jen’s reno
      • Real Renos
      • RENO ADDICT
    • 20240206_185022-01Before & after: tiles steal the show in 90s kitchen revamp
    • IMG_0235Kerb appeal: 3-bedder given fresh new look for retirees
  • Reno Addict
    • RENO ADDICT

      Looking for reno inspo? Find it all here, from other people’s projects to the latest trends, tools and products, whether you’re DIY-ing or employing trades.

      View articles

      • Reno Products
      • The Block
      • DIY
      • Reno Trends
      • Before & Afters
      • Real Renos
    • Screenshot 2025-05-13 at 3.09.43 pmBeautiful backyard transformation brings Italy to Bondi
    • Interiros,Shots,Of,A,Modern,Living,Room,In,The,ForegroundBeaumont Tiles’ best ever hard flooring range is here
  • Shopping
    • Shopping

      Want to know where to buy the latest furniture, homewares, rugs, art and more? We’re always sharing our latest finds and telling you where you can buy them.

      View Articles

      • Furniture
      • Homewares
      • Art
      • Smart Home
      • Appliances
      • Reno Products
    • Screenshot 2025-05-19 at 1.02.34 pmClean your carpets professionally at home without the dry time
    • Kopia av Ankarsrum-Assistent_Coral_12_Ny_webInnovative new Swedish mixer lands in Australia
  • Inspiration
    • Inspiration

      While Jen’s a legitimate interiors addict, she’s no design professional, so she calls on an army of the country’s best to share their expertise with you. Be inspired by their stories too!

      View Articles

      • Decorating 101
      • Interviews
      • Expert Tips
      • Before & Afters
      • House Tours
      • Designers
      • Styling
      • Renovating
      • Real Renos
      • Covet my coffee table
    • HighRes Image 4 – 360KCX31Z9Q Woollahra Village House by Tobias Partners – Photography by Justin AlexanderInnovative new residential architecture in Houses Awards list
  • Lifestyle
    • Lifestyle

      We’re mostly about the home but Jen also likes to share other things she thinks you’ll love, like food and travel.

      • Recipes
      • Travel
      • Parenting
    • Crispy egg noodles with seafood p. 116Foodie Friday: crispy egg noodles with seafood
    • 1293660_lifestyle Crossland Pearl GL-Porc Txt Rect 597×1195 UNI_Crossland_AMB 02_Living_PearlHow to bring your favourite travel destinations home
  • Jobs
    • Advertise on our job board
    • Job Board FAQs for advertisers

Paving made easy with our simple step-by-step guide

By Olivia Shead •

FacebookPinWhatsAppEmailTweet

Whether you’re looking to create a feature zone for dining or entertaining, complete a poolside area or build a garden path, pavers are a clever and effective way to make the best use of any space, and they’re a lot easier to lay than many people think. Time-poor homeowners are looking for practical ways to bring the family together while showcasing their individuality and personal style and DIY pavers fit this bill perfectly.

Here, are my step-by-step instructions for tackling any paving job.

1. Excavation

Step 1 - Excavation

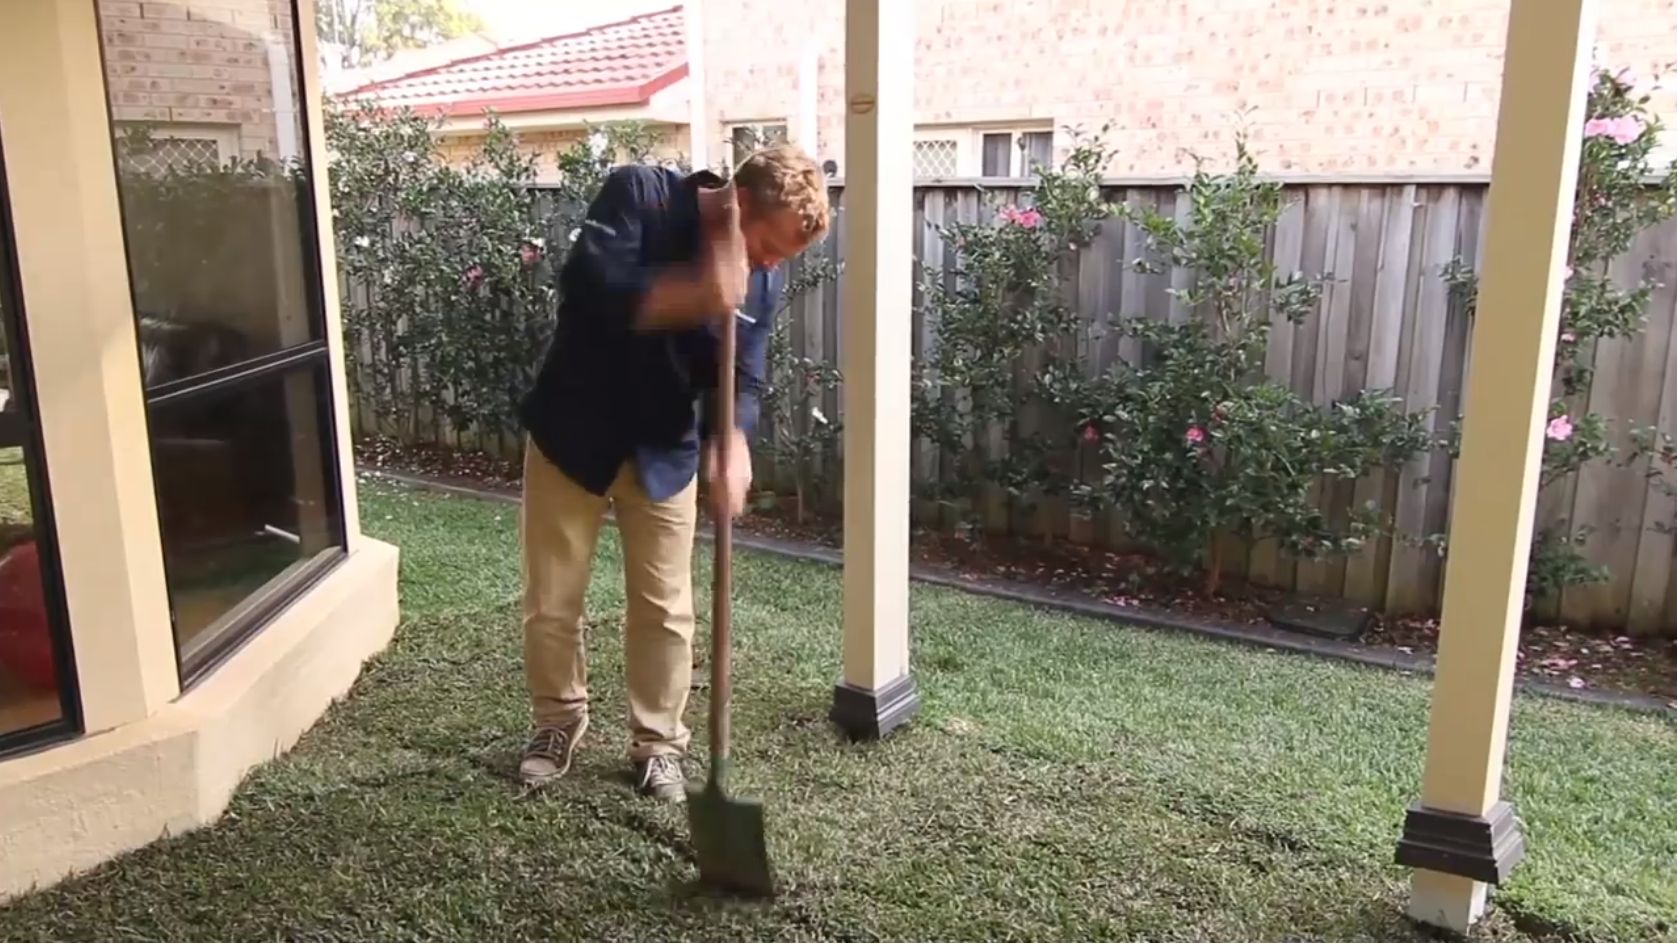
Mark out the area to be paved allowing a little extra for working room. Remove any soil, grass and all loose debris and vegetation and ensure to excavate deep enough to allow for selected paving and sub base construction. For pedestrian paving projects, you can work off 100mm of road base, 30mm of sand plus the thickness of your paver. (This is not applicable for driveway paving).

2. Preparing the base

Step 2 - Preparing Base

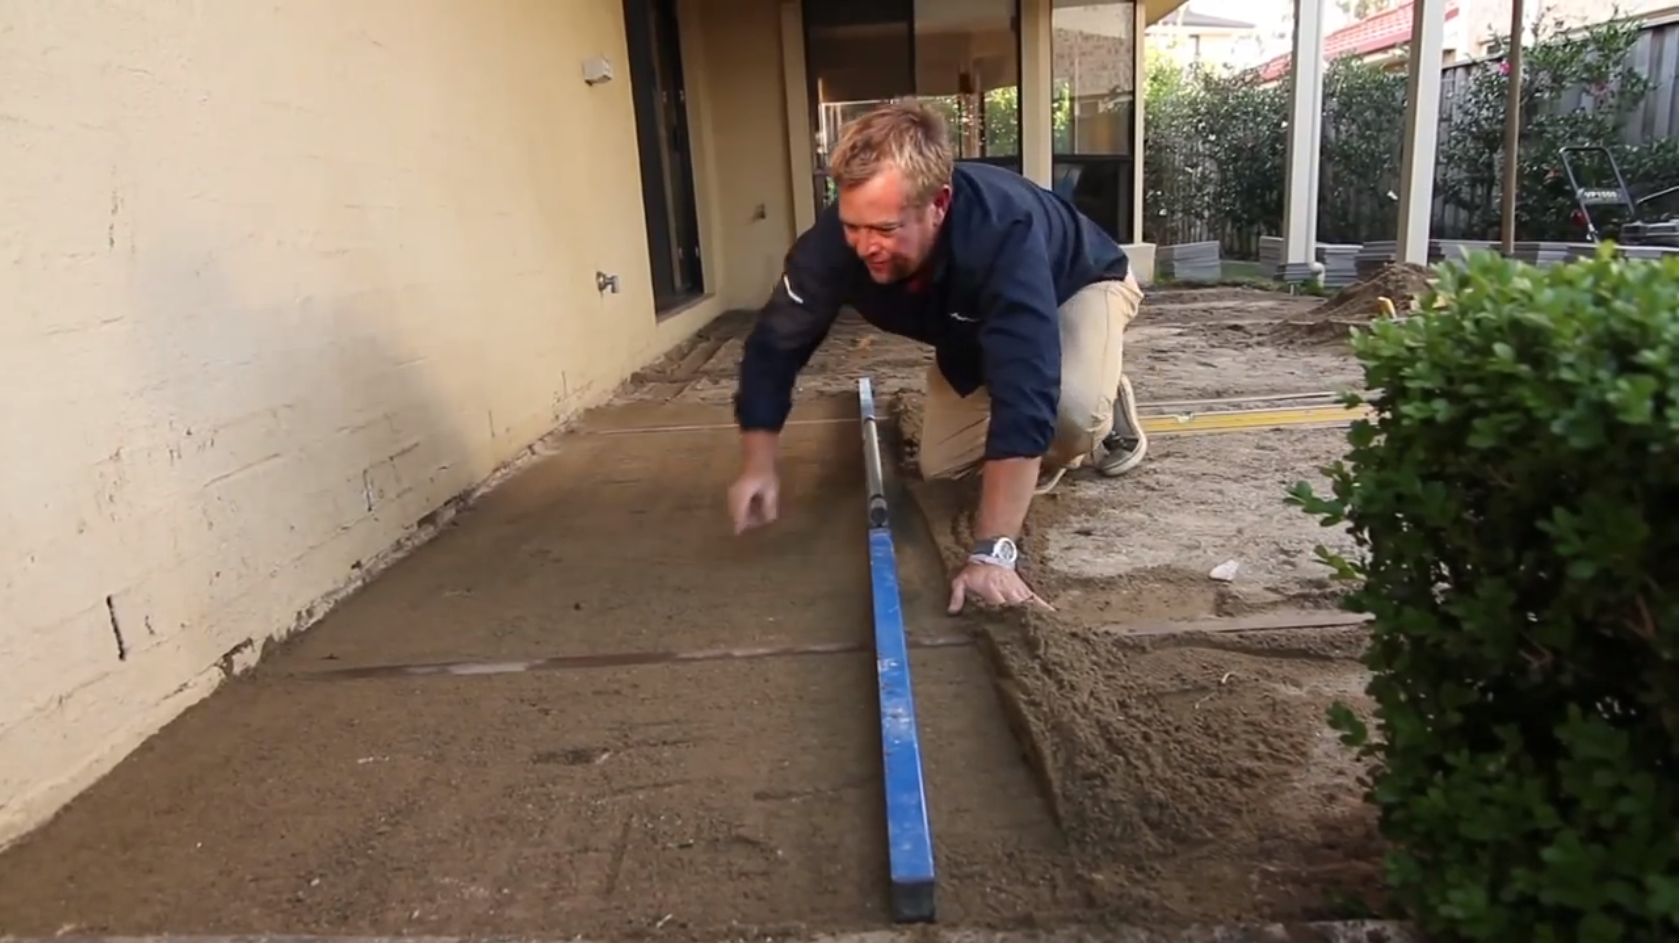
It’s all about the base! Getting the foundation right is the key to your long-lasting and low maintenance paved area. Start by distributing road base evenly over the excavated area. Compact the road base with a plate compactor (whacker-packer) at least twice – remember your hearing protection for this part of the job. Spread washed sand over the compacted road base to a thickness of 25-to-30mm. Screed the sand with a timber float or straight edge and ensure it is on the same plane – check with a spirit level.

3. Laying the pavers

Step 3 - Laying the pavers

Set up a string line running along the edge(s) of your paved area. The string line will help ensure your edges are straight and pavers are flush. Begin laying pavers starting at one end of the project and working your way across. Leave a 3mm gap between the pavers for the jointing sand (you will sweep this in later). Ensure each paver is square with the string line and level using the spirit level. Wriggle pavers into place and tap with rubber mallet where required to ensure level.

4. Edging and locking in the paving

Step 4 - Edging and locking in the paving

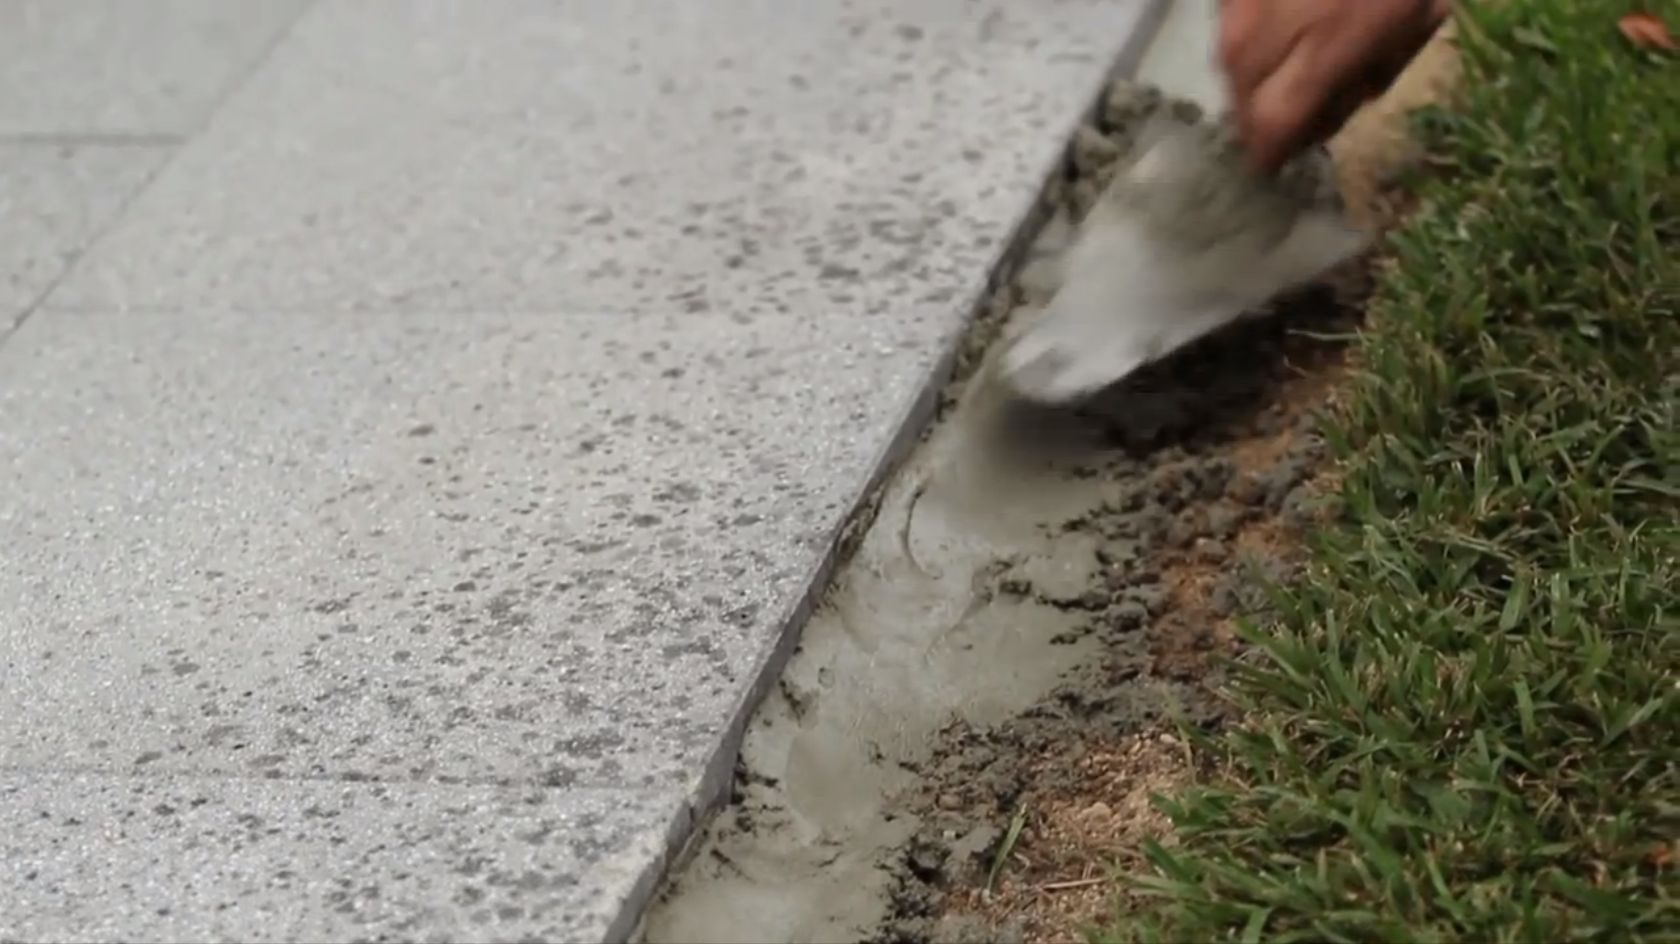
This is another really key step; you have laid your pavers and now you need to make sure they stay in place. Utilise a sand and cement mix to ‘haunch’ or lock-in around all sides of your pavers. This is achieved by making a small sand and cement mix in a wheelbarrow and then screeding this mix along the edge of your paver from the base to approximately 75 per cent of the paver’s height on an angle. This helps to ‘lock in’ the paved area and to help pavers stay in place. It does not hurt to also use a little of the sand and cement underneath the outer header course, as this will create even more strength.

5. Locking sand and sealing

Step 5 - Locking sand and sealing

Finally you can now add the locking sand. Sweep this sand in dry and it will fill the 3mm gaps you left in the pavers. Once the sand is settled you can use a whacker-packer with an old piece of carpet beneath it to compress and settle the pavers into the sand bed ensuring a great finish. Hose down area upon completion. Although not a must, sealers can enhance the look of the paver as well as protect it from both the elements and day-to-day wear and tear such as food fats and general staining.

— Jason Hodges is Australia’s well-loved celebrity landscaper, most notably seen on the Channel Seven lifestyle TV show Better Homes and Gardens. Jason is also a brand ambassador for Australia’s leading masonry manufacturer Adbri Masonry.

FacebookPinWhatsAppEmailTweet

October 22, 2015

Primary Sidebar

Popular This Week

  • Australian bathroom standards: dimensions explained by an expert

  • Beautiful backyard transformation brings Italy to Bondi

  • Innovative new Swedish mixer lands in Australia

  • Foodie Friday: crispy egg noodles with seafood

  • World first fully customisable cot for the interiors addict mum

Follow us on Instagram

Swipe for before ▶️▶️▶️ This kitchen Swipe for before ▶️▶️▶️ 

This kitchen is small but mighty and very very pretty! Swipe through for the finer details of this reno by Casa & Co Interior Design. It sure went from boring beige 90s to stylish and full of detail and storage!

What do you think?

Read all about it on the blog now via link in bio/stories.

#smallkitchenideas #kitchentile #potfiller #featuretiles #hamptonskitchen #pulloutpantry
A Melbourne husband and wife duo have launched the A Melbourne husband and wife duo have launched the world's first fully customisable cot, offering countless options to personalise your baby's space and change it as the mood takes you!

@bold_baby_co cots are made from sustainably sourced European beechwood, and are finally available after four years of meticulous design and safety testing.

Tag a pregnant friend who'd love these!

Read more on the blog now, via link in bio and stories.

#melbournesmallbusiness #cotdesign #designernursery #nurserydesignideas #babycot
This small backyard makeover is NEXT LEVEL. @jone This small backyard makeover is NEXT LEVEL.

@jonesandco_ founder Jennifer Jones wanted an Italian vibe for her North Bondi semi and wow did @landart_home_garden_beyond deliver her vision. And then some!

Comment 'Positano' for the link to read all about it, including the antique terracotta Italian roof tiles around the curved pool, firepit, olive and lemon trees and lavender!🪻 Chef's kiss👌🏼

Size is NOT everything!

#smallpool #smallpools #smallbackyard #firepitdesign #smallgardenideas #crazypaving
Swipe for the rear of this gorgeous Woollahra home Swipe for the rear of this gorgeous Woollahra home. Heaven!

It's a finalist in the Houses Awards 2025. Head to the blog via link in bio/stories to see more of the shortlist. There's some absolute BEAUTIES.

Project by @tobiaspartners 📸 @justinalexanderphoto

#housesawards #housesawards2025 #woollahravillage #woollahra #woollahrahomes #australianarchitecture #australianarchitect
Edit: the winner is Kathy Petersen of VIC. To cel Edit: the winner is Kathy Petersen of VIC.

To celebrate @sataraliving's beautiful and biggest ever new collection we're giving away a $500 voucher! Comment 'satara' for the link to the easy entry form and more info on this everyday luxury range!

This giveaway is in no way associated with or endorsed by Meta.

#australianfurniture #australianfurniture #australianinteriors #relaxedluxury
I always LOVE a new IKEA STOCKHOLM (widely known a I always LOVE a new IKEA STOCKHOLM (widely known as the IKEA best of) collection and 2025 is in Australian stores NOW.

I'm getting that floor lamp at a minimum.

Karin Gustavsson, creative leader for STOCKHOLM, IKEA Sweden, said: “The purpose of the STOCKHOLM collections has always been to prove that high quality doesn’t need to come at an intimidating cost. We have worked to create a no-compromise kind of collection where every piece tells a story."

Check it out on the blog now via link in bio and stories.

Don't hang around as these pieces always sell out fast.

#ikeastockholm #ikeastockholm2025 #ikeaaustralia #ikeahack
Building new isn't the only way to get a climate f Building new isn't the only way to get a climate friendly home. CSIRO research indicates that over half of the houses Australians will live in by 2050 already exist today. And those homes — from our 1950s weatherboards to mid-century gems — offer one of the most exciting opportunities to slash emissions, cut energy bills, and reimagine home design for a low-carbon future.

Welcome to the rise of retrofit culture: a movement that’s proving you don’t need to knock down to level up.

We're having this discussion on the blog today and sharing examples of two older homes given new, more sustainable, leases on life.

Head over via link in bio and stories.

Love to know your view on knockdown rebuild vs. Renovating older homes and what you have done and why in the comments!

@reneworgau

#sustainablehousing #sustainablehome #sustainablelivingaustralia #climatefriendlyhome #passivhaus #passivhausdesign
Swipe for the before! You won't believe it! This Swipe for the before! You won't believe it!

This upcycle started with a freebie off Marketplace and with some vision, elbow grease and chalk paint, became a beautiful shelving solution for Home Beautiful stylist @style_by_lucy 

Lucy's a bit of a Marketplace pro and she even found the Samsung Frame TV on there 😯

Tell us about your best marketplace finds in the comments?

All the details of how she did this including paint colour on the blog now, via link in bio and stories.

#upcyclefurniture #upcyledfurniture #upcycledsideboard #marketplacefinds
A year in, this reluctant soccer mum has realised A year in, this reluctant soccer mum has realised 'if you can't beat 'em, join 'em'!

So, as I start thinking about the boys going into separate rooms later this year, I've been researching non-ugly soccer-themed linen, rugs, art, wallpaper and more for Seb's room, which I'll be as happy with as he will! 

Head to the blog via link in bio/stories for all the details and links to buy. My favourite is the wallpaper mural from @oliveetoriel 

#soccermom⚽️ #footballbedroom #boysbedroomideas #kidsroomart #kidsroomstyling #kidsroomwallpaper
Follow on Instagram
Visit Jen's profile on Pinterest.

Get Your Free Ebook

Ebook cover

Never miss the latest renovating and interiors products, news and inspo again! Sign up for our newsletter and we'll send you the best bits from the blog, direct to your inbox. Plus you'll get our latest eBook: Just One Thing To Elevate Your Interior, featuring Australia's top design talent.

This field is for validation purposes and should be left unchanged.

About Olivia Shead

When she's not writing for Interiors Addict, Olivia is now a TV and radio news producer. She's a journalism graduate of UTS Sydney.

More from DIY

Home Beautiful stylist’s clever upcyled shelves for own home

Know your laminate from your hybrid? Hard flooring explained

Two long weekends in a row? It’s time to do some DIY!

Stylish sage laundry on a budget looks like it cost way more

Measure twice, cut once: avoiding mistakes with your DIY kitchen

Bus conversion: creative friends who created a quirky weekender

Couple render entire bedroom and en suite with stunning results

Stunning blue wardrobes the star of DIY nursery project

Affordable kitchen cabinetry with a local story

Reader Interactions

Comments

  1. Ann says

    November 27, 2017 at 12:28 pm

    I have done all the above but when I hose down the pavers the sand washes out of the joints? Would a sealer stop this.

Promo Area

Footer

Interiors Addict

Interiors Addict

  • About
  • Contact
  • Work with Jen
  • Press
  • Jobs
  • Privacy Policy
  • Disclosure Policy

Browse

  • RENO ADDICT
  • Jen’s Reno
  • House Tours
  • Real Renos
  • Interviews
  • Styling
  • Designers
  • Bedrooms
  • Covet My Coffee Table
  • Expert Tips
  • The Block
  • Art
  • Furniture
  • Recipes

Follow Us

  • Facebook
  • Instagram
  • Pinterest
  • RENO ADDICT

Copyright © 2011–2025 Addicted Media Pty Ltd
Website care by ClickWP · Log in