• Skip to primary navigation
  • Skip to main content
  • Skip to primary sidebar
  • Skip to footer

The Interiors Addict

Heart Your Home

@interiorsaddict on Instagram   @interiorsaddict on Facebook   @interiorsaddict on Pinterest  
Subscribe
  • Job Board
  • About
  • Before & Afters
  • RENO ADDICT
  • Kitchens
  • Bathrooms
  • Kids Rooms
  • Bedrooms
  • Living Room
  • Shopping
  • Expert Tips
  • Recipes
  • Parenting
  • Travel
Interiors Addict
  • Job Board
  • About
    • Our Story

      Australiaโ€™s largest interior design, styling and renovation blog for the everyday Aussie. By former journalist and magazine editor Jen Bishop, the original interiors addict!
      READ MORE

      Weโ€™re big on Instagram!
      @interiorsaddict

      • About
      • Contact Interiors Addict
      • Work with Interiors Addict
      • Advertise / Find a job in Interiors
      • Press
      • Get Your Free Ebook

        This field is for validation purposes and should be left unchanged.
    • bookcover-jens-reno
  • By Room
    • Browse by Room

      Where you can search for all our posts about a specific room. Only interested in kitchens and bathrooms? We got you!

      • Kitchens
      • Bathrooms
      • Kids Rooms
      • Bedrooms
      • Living Room
      • Home Office
      • Dining
      • Laundry
      • Outdoor & Exteriors
      • Renting
    • bookcover-jens-reno
  • Before & Afters
    • Before & Afters

      Who doesnโ€™t LOVE a good before & after? If you want to be inspired by the whole reno process, and not just the shiny photos at the end, this is the place for you!

      View Articles

      • Before & Afters
      • Jen’s reno
      • Real Renos
      • RENO ADDICT
    • AFTER lounge room1980’s arch inspires amazing apartment before and after
    • AFTER lounge80’s beach shack now an eclectic, retro-inspired holiday home
  • Reno Addict
    • RENO ADDICT

      Looking for reno inspo? Find it all here, from other peopleโ€™s projects to the latest trends, tools and products, whether youโ€™re DIY-ing or employing trades.

      View articles

      • Reno Products
      • The Block
      • DIY
      • Reno Trends
      • Before & Afters
      • Real Renos
    • EnsuiteLuxury lakeside living on NSW South Coast: A fab reno
    • AFTER lounge room1980’s arch inspires amazing apartment before and after
  • Shopping
    • Shopping

      Want to know where to buy the latest furniture, homewares, rugs, art and more? Weโ€™re always sharing our latest finds and telling you where you can buy them.

      View Articles

      • Furniture
      • Homewares
      • Art
      • Smart Home
      • Appliances
      • Reno Products
    • Soffle_Nina-Szewczyk3How to decorate your rental home in a damage-free way
    • AilantoThe best new interior finds for kids + designer chair giveaway!
  • Inspiration
    • Inspiration

      While Jenโ€™s a legitimate interiors addict, sheโ€™s no design professional, so she calls on an army of the countryโ€™s best to share their expertise with you. Be inspired by their stories too!

      View Articles

      • Decorating 101
      • Interviews
      • Expert Tips
      • Before & Afters
      • House Tours
      • Designers
      • Styling
      • Renovating
      • Real Renos
      • Covet my coffee table
    • Soffle_Nina-Szewczyk3How to decorate your rental home in a damage-free way
  • Lifestyle
    • Lifestyle

      Weโ€™re mostly about the home but Jen also likes to share other things she thinks youโ€™ll love, like food and travel.

      • Recipes
      • Travel
      • Parenting
    • 0Q7A5539Foodie Friday: Confit salmon with preserved lemon & pomegranate
    • Burrawang HouseNew Hamptons style luxury retreat in the NSW Southern Highlands
  • Jobs
    • Advertise on our job board
    • Job Board FAQs for advertisers

DIY: How to build your own marble effect plinth

July 19, 2022 Leave a Comment

FacebookPinEmailTweet

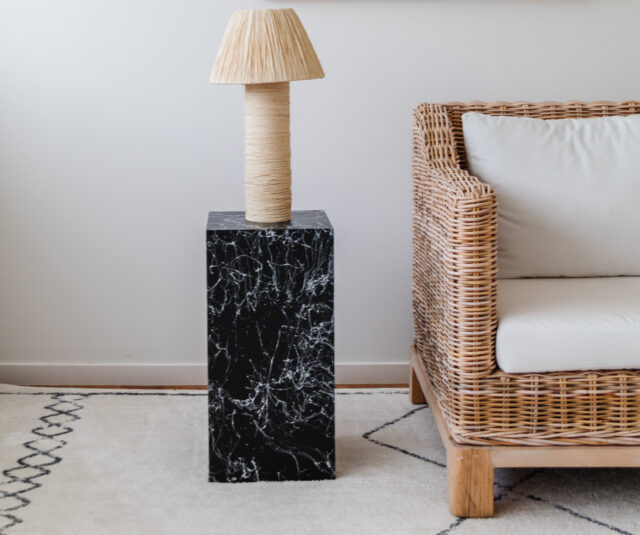
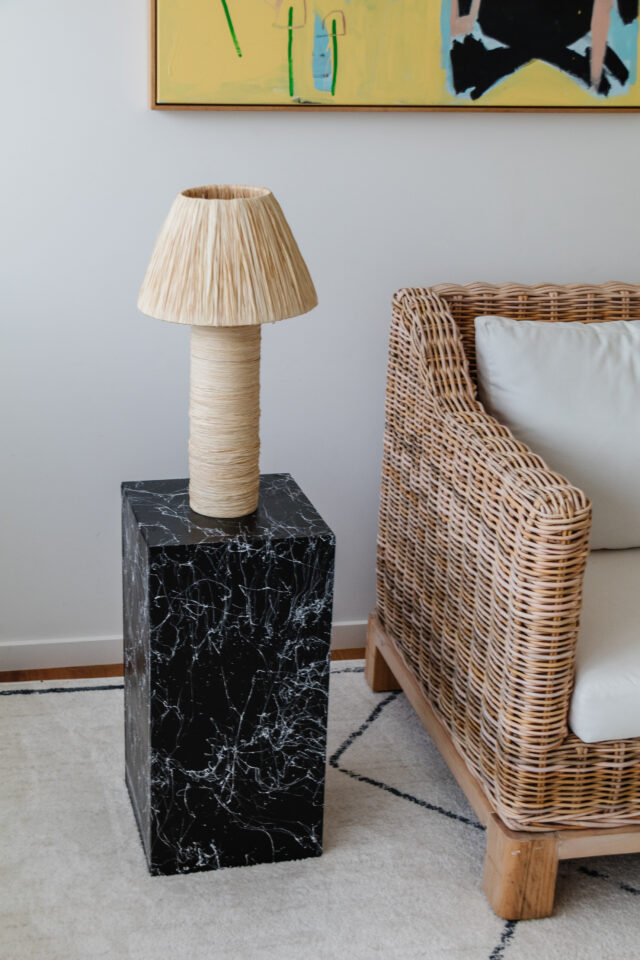
Bunnings partnered with Jaharn Quinn of Smor Home to bring us this guide on how to build your own marble effect plinth that you can use for displays at home.

Before you start this project, if you donโ€™t have a mitre saw at home, which will help you cut perfectly straight lines through your MDF panels, experts at hardware stores are able to cut the panels for you. You could cut the MDF panel using a jigsaw but it wouldnโ€™t create the perfectly straight edges you need for this plinth.

Materials

  • 2 x MDF panel 1200mm x 600mm cut into 4 sides and 1 top (there are more details on this below). Preferably 12mm thick or more.
  • Measuring tape
  • Chipboard countersunk screws
  • Multipurpose filler
  • Microfibre roller
  • Paint tray
  • Black gloss exterior paint
  • Dulux DuraMax Marble Effect Spray Paint (or similar paint of choice)

You will need a sander, and a drill with a Phillips head bit and a multi-purpose drill bit for drilling into the MDF panels.

Measurements

  • 4 x 600mm x 300mm
  • For the top of the plinth, you will need to mock assemble the four sides and take your measurement. The sides of the top of the plinth wonโ€™t all be equal or a perfect square, rather e.g. 2 x sides 300mm and 2 x sides 310mm.

How To

  1. The first thing you need to do is build the plinth. Drill three pilot holes along the length of one piece of MDF.
  1. Prop this piece and another piece of MDF together at a 90 degree angle. Make sure the ends are lined up perfectly (or as best you can). Holding it together (itโ€™s a bit awkward but as soon as you get this done the rest is a bit easier), drill through the existing pilot holes and keep going so you drill further pilot holes into the second piece of MDF. Then you will switch to a phillip head drill bit, and drill a countersunk screw into each pilot hole. You will now have two pieces of MDF joined together at a 90 degree angle. Keep working your way around until you have created a plinth (without the top). Your goal is to drill the nails in so they are flush with the surface of the plinth. You may drill the screws too deep into the MDF, donโ€™t worry as we will fill these holes/gaps in with filler later on. You may not quite be able to drill the screws flush with the surface – keep trying and if all else fails, bang them a few times with a hammer.
  1. Repeat the pilot hole process followed by drilling in the screws for the top of the plinth. You will now have a plinth!
  1. Fill in the screws and any deeper gaps using multipurpose filler. Set aside to dry for at least 3 hours, or less if the day is hot and dry. Sand the multipurpose filler so itโ€™s flush with the surface.
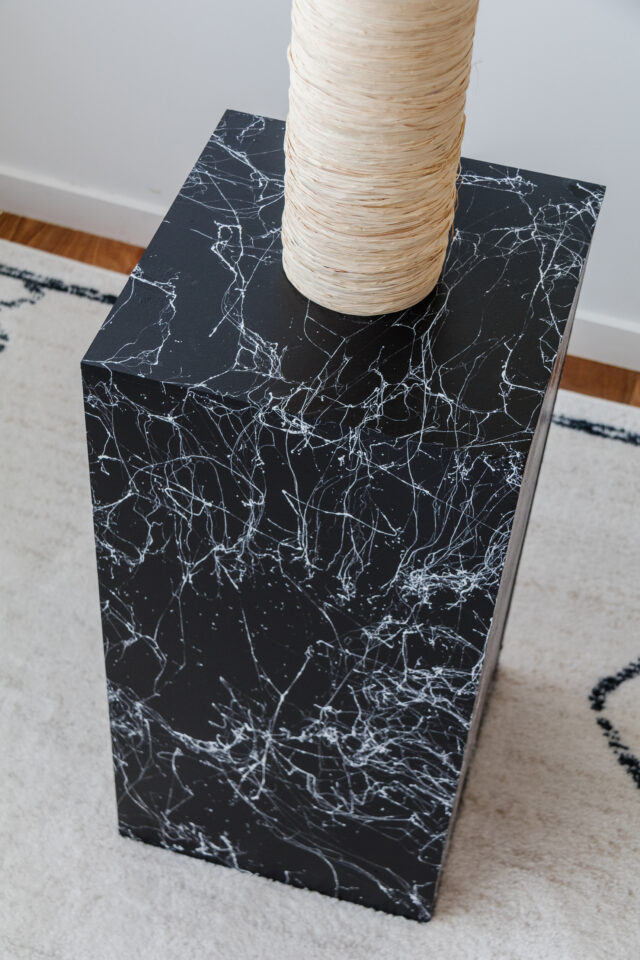
  1. Paint the plinth with black gloss paint. Apply at least 2 to 3 coats. When the paint has dried, apply the marble effect spray paint as per the instructions. I recommend practicing on leftover MDF, and make sure the MDF piece is vertical when you spray as this will emulate how you will apply it onto the plinth. I found soft sprays and letting the air settle the marble effect spray paint really helped. Donโ€™t apply it straight on, too close or directly. Instead lightly spray it on from a good distance. if you find some of the marble effect hanging (youโ€™ll know when I mean when you use it), carefully lift it and let it drop naturally and organically. Try not to over spray otherwise it wonโ€™t look natural.ย  The spray paint dries really quickly too so after a few minutes, youโ€™ll have a beautiful DIY Marble Effect Plinth!

More from Bunnings

More from Jaharn Quinn

Greek busts right at home in modern homes: meet Mercer & Lewis
It all started with a trip back to Greece three years ago. Stylist Olga Lewis was sourcing for products she…

FacebookPinEmailTweet

Primary Sidebar

Popular This Week

  • Lounge room 90’s era abode now bold and fun holiday home
  • AFTER lounge 80’s beach shack now an eclectic, retro-inspired holiday home
  • Terrazzo and character are in and grey is out, says designer
  • Palette Cam 15 apps to help you build your dream home
  • Australian kitchen dimensions: standard sizes for every last detail

Follow us on Instagram

I'm absolutely loving the simple yet on trend scal I'm absolutely loving the simple yet on trend scallop design and colour pop of these lampshades from new brand @soffle_lights 

Read founder Sophie Cartwright's top tips for transforming your rental home on the blog now. Via link in bio.

Which colour is your fave?!

#lampshademaker #lampshadedesign #lampshademaking #floorlamps #lampshades #scalloped #sofflelights #lightingdecor #rentaldecor #rentalhome #interiorsaddict #theinteriorsaddict #jenbishop #heartyourhome
While we featured a gloriously colourful home on M While we featured a gloriously colourful home on Monday, this one is a masterclass in serene neutrals! And how good is this bunk room?!

Take the tour on the blog now. Via link in bio.

#neutralhome #neutralhomedecor #bunkroom #bunkbed #bunkbedsforkids #builtinbunkbeds #skylights #interiorsaddict #theinteriorsaddict #jenbishop #heartyourhome #realhomes #holidayhousesofinstagram #nswsouthcoast #wollongong #wollongonghomes

@projection_build @lumiere_collective @shersonarchitecture 
๐Ÿ“ท@the.palm.co
Washable rugs, eco-friendly play mats, reversible Washable rugs, eco-friendly play mats, reversible linen, gorgeous wallpaper and the chance to win a beautiful bouclรฉ recliner chair!

Today's kids room roundup is full of loveliness if we don't say ourselves!

Via link in bio now.

#kidsroomstyling #kidswallpaper #playmats #feedingchair #nursingchair #nurseryroomdecor #washablerugs #washablerug #bouclechair #interiorsblog #interiorsblogger #interiorsaddict #theinteriorsaddict #jenbishop #heartyourhome
A glass shower screen is not the only option! In A glass shower screen is not the only option!

In this 80s villa reno, @trentinidesign took inspiration from an archway typical of the era and used it throughout the home.

The bathroom was transformed from a classic three-piece set up that included a shower, bath and vanity. Kathryn removed the bath and split the room in half and designed an arch to sit between the two zones. 

โ€œI wanted something spectacular. Rather than having a vanity with a piece of glass like you would typically see, I was really trying to push myself as a designer. It was costly but it worked out well and the feedback has been great."

Swipe for the before and follow the link in bio to see the rest of this home.

#bathroomdesignideas #bathroomtrends2023 #showerscreen #showerscreens #archways #apartmentrenovation #interiorsblogger #interiorsaccount #interiorsaddict #theinteriorsaddict #jenbishop #realreno
One half of popular parenting podcast @wedonthavet One half of popular parenting podcast @wedonthavetimeforthis, turns out former Neighbours actor @gemma_peanut is even more multi-talented than we thought! Will you check out the joyful and colourful reno of her holiday home (and airbnb) @yo_caba_caba?!

Head over to the blog via link in bio to read all about why she went bold and full of pattern in this project, which is a stark contrast to her zen and neutral Northern Beaches abode.

There's also plenty of details about where things are from etc.

"Iโ€™m not an interior designer so I just chose what I liked and followed my gut. Ultimately this home has been an opportunity to explore my alter ego โ€“ it allowed me to do things that I wouldnโ€™t normally do.โ€

๐Ÿ“ท @tanikablair_photography 

#interiorsblog #interiorsaddict #theinteriorsaddict #jenbishop #gemmapeanut #wedonthavetimeforthis #parentingpodcast #parentingpodcasts #holidayhousesofinstagram #cabaritabeach #airbnbstyle #airbnbstyling #colourandpattern #wallpapergoals #patternedtiles #featuretiles #poolgoals #sparkjoy #yocabacaba #boldinteriors #funinteriors #colourfulkitchen
Not many friends in life fall into the unofficial Not many friends in life fall into the unofficial family category and they're a special gift. So ends three weeks with @danisteve81 who left her husband and son in the UK (I'm forever grateful they lent her to me!) to come and cheer me up and help me in the most practical ways after I spent Christmas and New Year in hospital. There were tears and I miss her so much already but how amazing to have had all that time together as adults. Such a rare treat and would never have happened without having been through something so challenging. Silver linings and all that. So many other friends have also been incredibly thoughtful and kind. There aren't many times I'd say this without cringing but I am 100% blessed!

I still cannot believe we have been friends since we were 12! 12! Are you still close with your childhood besties?
The renovation of this 80s beach shack @camillo_ho The renovation of this 80s beach shack @camillo_house is a work of art and while almost every surface was updated, the decision to keep the original slate floor was genius if you ask us. 

Owner @clarehillier__ says: "With its purple, pink, red and brown tones, the slate was the starting point for our interior palette."

Come and check out the before and afters via link in bio now and read the reno story. It's a real beauty.

And you can book it for your next holiday too!

Blair Smith Architecture @kateshanasy

#slatefloor #slatefloors #80shouse #80sbeauty #camillohouse #interiorsblog #interiorsblogger #interiorsaddict #theinteriorsaddict #jenbishop #realreno #holidayhousesofinstagram #morningtonpeninsulahomes #morningtonpeninsula #morningtonpeninsulasmallbusiness #blairgowrie #blairgowriebeach #airbnbstyle
Me and my boys ๐Ÿ’— Me and my boys ๐Ÿ’—
Just a couple of dorks who've been friends for thr Just a couple of dorks who've been friends for three decades going out for a child-free dinner ๐Ÿ’“๐Ÿ˜
Follow on Instagram
Visit Jen's profile on Pinterest.

Get Your Free Ebook

Ebook cover

Never miss the latest renovating and interiors products, news and inspo again! Sign up for our newsletter and we'll send you the best bits from the blog, direct to your inbox. Plus you'll get our latest eBook: What Made The Biggest Impact in Jen's Own Reno.
This field is for validation purposes and should be left unchanged.
Jekyll Chau

About Jekyll Chau

Jekyll Chau is interning at Interiors Addict as part of his Master of Communication and Journalism at UNSW.

More from DIY

Average cost to fix a botched DIY job is $1500

5 tips for first time painters: it’s all in the prep!

Selleys bring out the perfect addition for matt bathrooms

How to create a mudroom in a hallway or alcove

DIY: Powder room and laundry makeover for under $500!

Styl Studio box

DIY interior design kits delivered to your doorstep

Fuse function and style in the home’s unsung hero

Mouldings: essential design element for layering modern homes

A DIY abstract cabinet hack from Bunnings

Reader Interactions

Leave a Reply Cancel reply

Your email address will not be published. Required fields are marked *

Recipe Rating


Footer

Interiors Addict

Interiors Addict

  • About
  • Contact
  • Work with Jen
  • Press
  • Jobs
  • Privacy Policy
  • Disclosure Policy

Browse

  • RENO ADDICT
  • Jen’s Reno
  • House Tours
  • Real Renos
  • Interviews
  • Styling
  • Designers
  • Bedrooms
  • Covet My Coffee Table
  • Expert Tips
  • The Block
  • Art
  • Furniture
  • Recipes

Follow Us

  • Facebook
  • Instagram
  • Pinterest
  • RENO ADDICT

Copyright © 2011–2023 Addicted Media Pty Ltd
Website care by ClickWP ยท Log in

Share this ArticleLike this article? Email it to a friend!

Email sent!