• Skip to primary navigation
  • Skip to main content
  • Skip to primary sidebar
  • Skip to footer

The Interiors Addict

Heart Your Home

@interiorsaddict on Instagram   @interiorsaddict on Facebook   @interiorsaddict on Pinterest  
Subscribe
  • Job Board
  • About
  • Before & Afters
  • RENO ADDICT
  • Kitchens
  • Bathrooms
  • Kids Rooms
  • Bedrooms
  • Living Room
  • Shopping
  • Expert Tips
  • Recipes
  • Parenting
  • Travel
Interiors Addict
  • Job Board
  • About
    • Our Story

      Australia’s largest interior design, styling and renovation blog for the everyday Aussie. By former journalist and magazine editor Jen Bishop, the original interiors addict!
      READ MORE

      We’re big on Instagram!
      @interiorsaddict

      • About
      • Contact Interiors Addict
      • Work with Interiors Addict
      • Advertise / Find a job in Interiors
      • Press
      • Get Your Free Ebook

        This field is for validation purposes and should be left unchanged.
    • bookcover-jens-reno
  • By Room
    • Browse by Room

      Where you can search for all our posts about a specific room. Only interested in kitchens and bathrooms? We got you!

      • Kitchens
      • Bathrooms
      • Kids Rooms
      • Bedrooms
      • Living Room
      • Home Office
      • Dining
      • Laundry
      • Outdoor & Exteriors
      • Renting
    • bookcover-jens-reno
  • Before & Afters
    • Before & Afters

      Who doesn’t LOVE a good before & after? If you want to be inspired by the whole reno process, and not just the shiny photos at the end, this is the place for you!

      View Articles

      • Before & Afters
      • Jen’s reno
      • Real Renos
      • RENO ADDICT
    • after buffet landscapeUpcycling project: buffet gets a glow up with paint and handles
    • KitchenSerial renovators embark on 15th house and this one’s for keeps!
  • Reno Addict
    • RENO ADDICT

      Looking for reno inspo? Find it all here, from other people’s projects to the latest trends, tools and products, whether you’re DIY-ing or employing trades.

      View articles

      • Reno Products
      • The Block
      • DIY
      • Reno Trends
      • Before & Afters
      • Real Renos
    • AFTER kitchenRun-down 1950’s house renovated with stylish farmhouse vibe
    • Brolga – James Hardie Shoot-5533Choosing the right builder: Neil Hipwell shares his top tips
  • Shopping
    • Shopping

      Want to know where to buy the latest furniture, homewares, rugs, art and more? We’re always sharing our latest finds and telling you where you can buy them.

      View Articles

      • Furniture
      • Homewares
      • Art
      • Smart Home
      • Appliances
      • Reno Products
    • IMG_2125Today’s tablescape is colourful and fun. We’re here for it!
    • Hali-Rugs-x-Jason-Grant-0374Recycled bottles feel so soft in new rugs by Hali & Jason Grant
  • Inspiration
    • Inspiration

      While Jen’s a legitimate interiors addict, she’s no design professional, so she calls on an army of the country’s best to share their expertise with you. Be inspired by their stories too!

      View Articles

      • Decorating 101
      • Interviews
      • Expert Tips
      • Before & Afters
      • House Tours
      • Designers
      • Styling
      • Renovating
      • Real Renos
      • Covet my coffee table
    • AFTER kitchenRun-down 1950’s house renovated with stylish farmhouse vibe
  • Lifestyle
    • Lifestyle

      We’re mostly about the home but Jen also likes to share other things she thinks you’ll love, like food and travel.

      • Recipes
      • Travel
      • Parenting
    • Screen Shot 2022-03-15 at 4.23.09 pmFoodie Friday: Mild chilli, avocado & goats cheese toast
    • Isla-MotelHip new motel renovation on NSW South Coast
  • Jobs
    • Advertise on our job board
    • Job Board FAQs for advertisers

Saving money by using VJ panels instead of tiles in our new en suite reno

February 22, 2021 7 Comments

FacebookPinEmailTweet

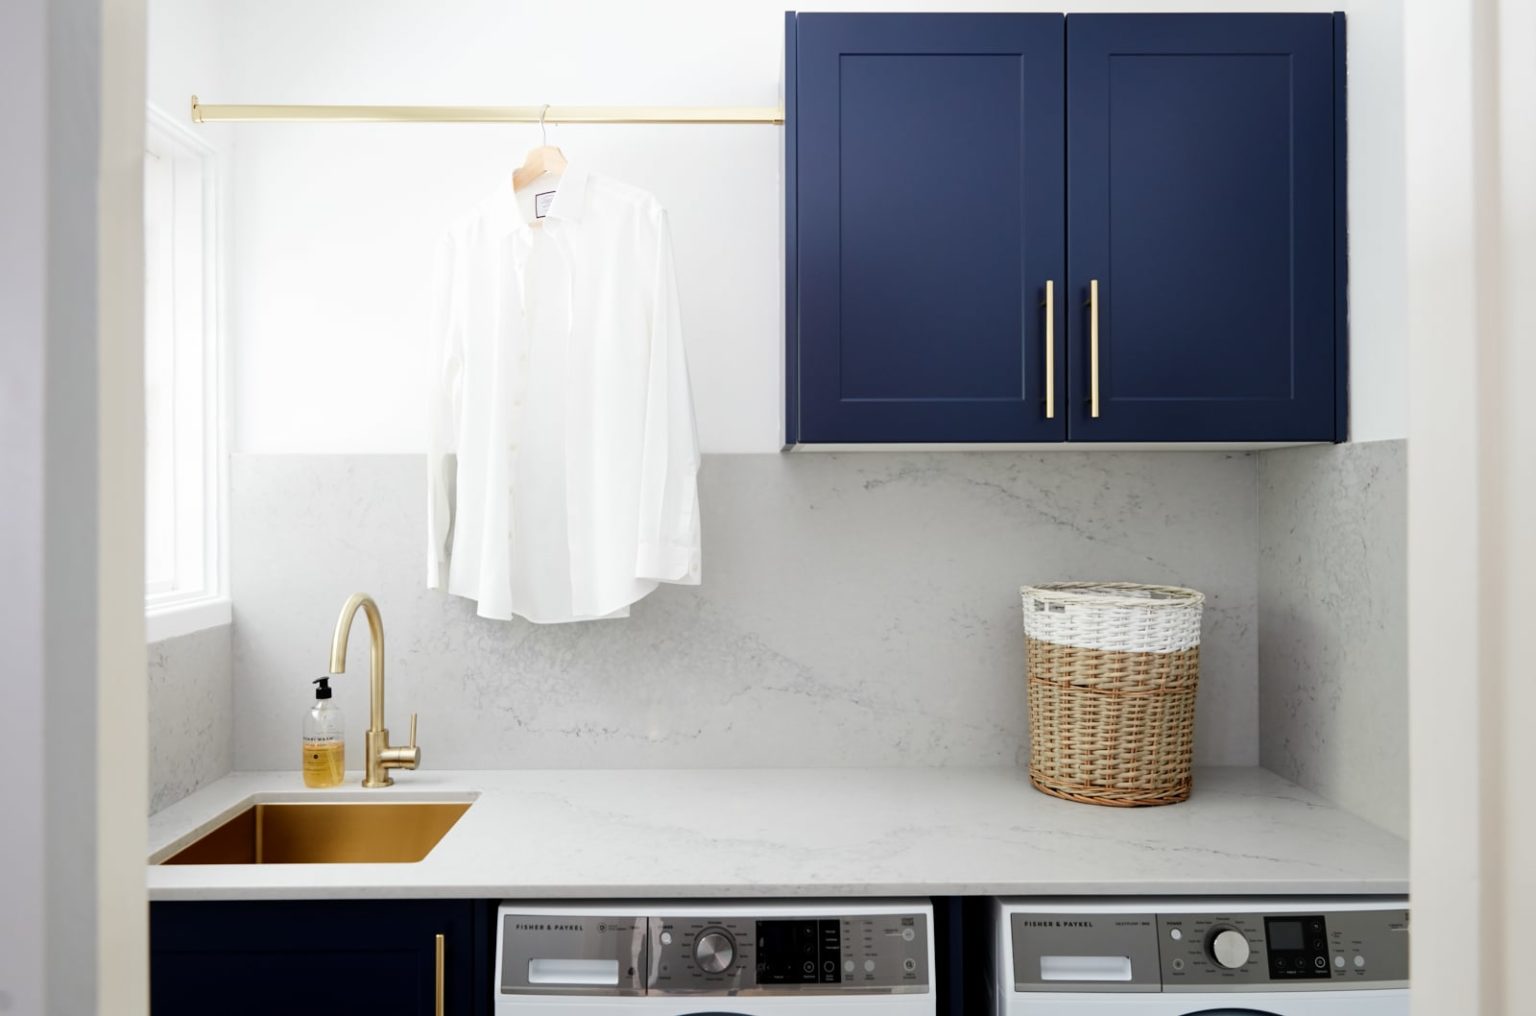
Welcome to the third and final Monday in a row (for a while, anyway!) of sharing a project from my very own home! I hope you enjoyed the flatpack built-in entertainment unit and the navy and gold laundry earlier in the month!

Light, bright and classic

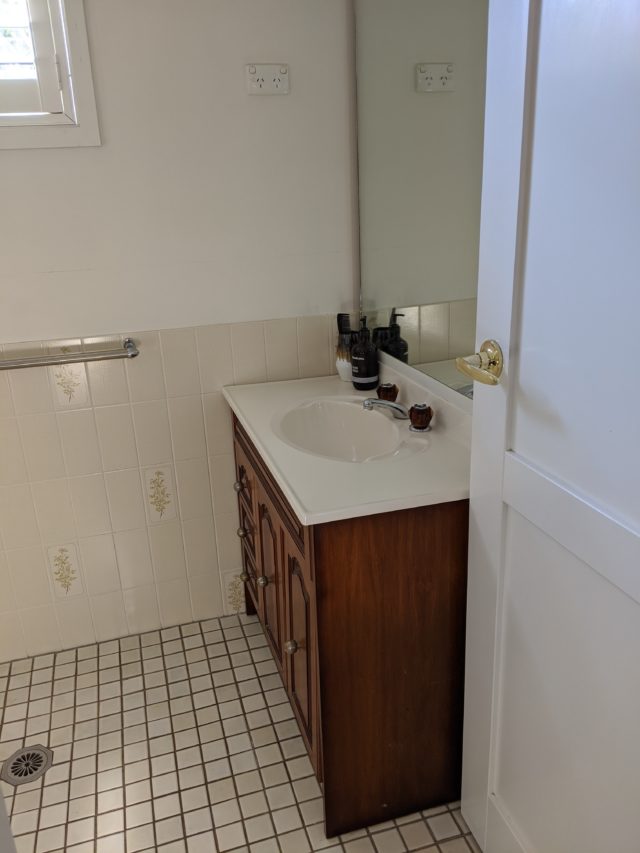
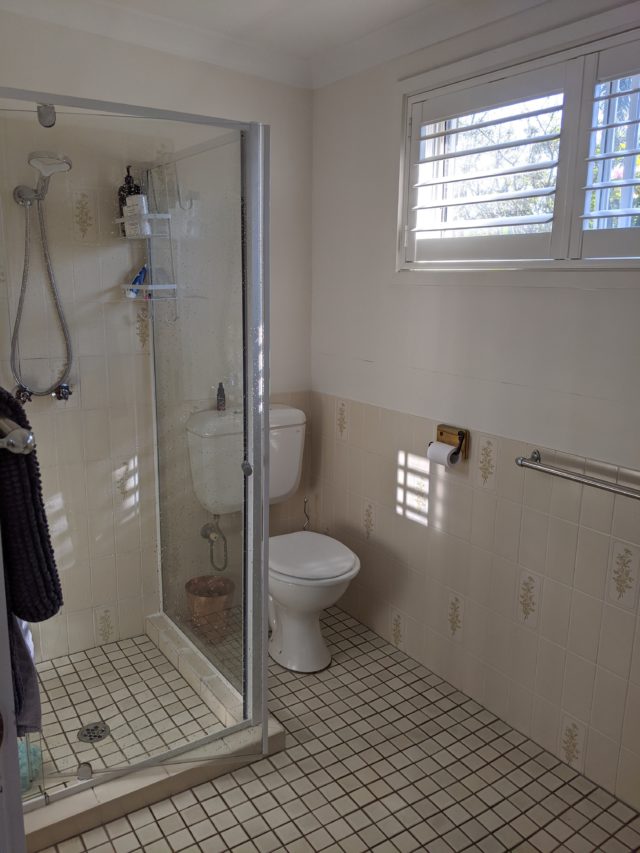
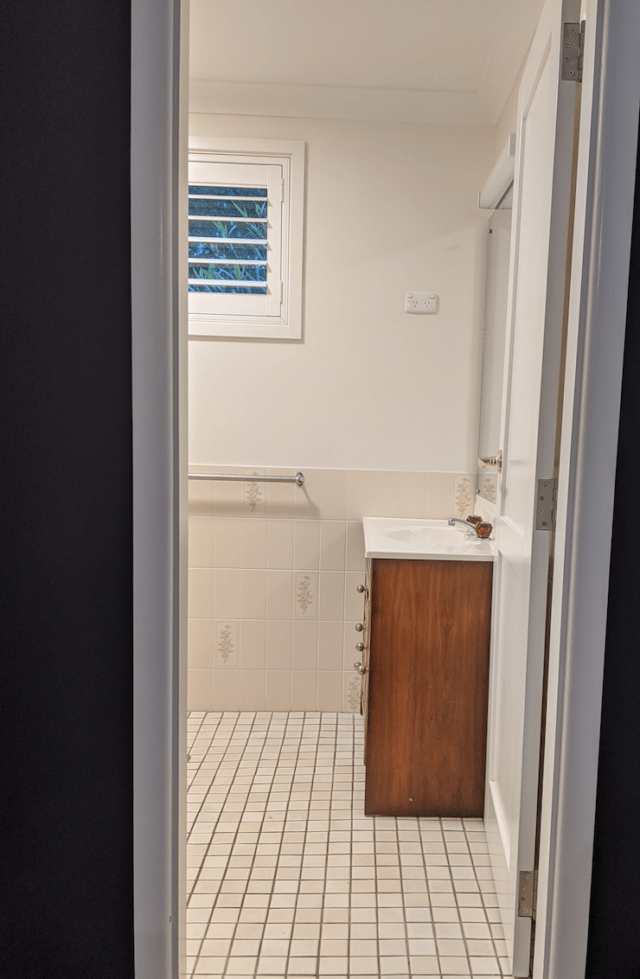
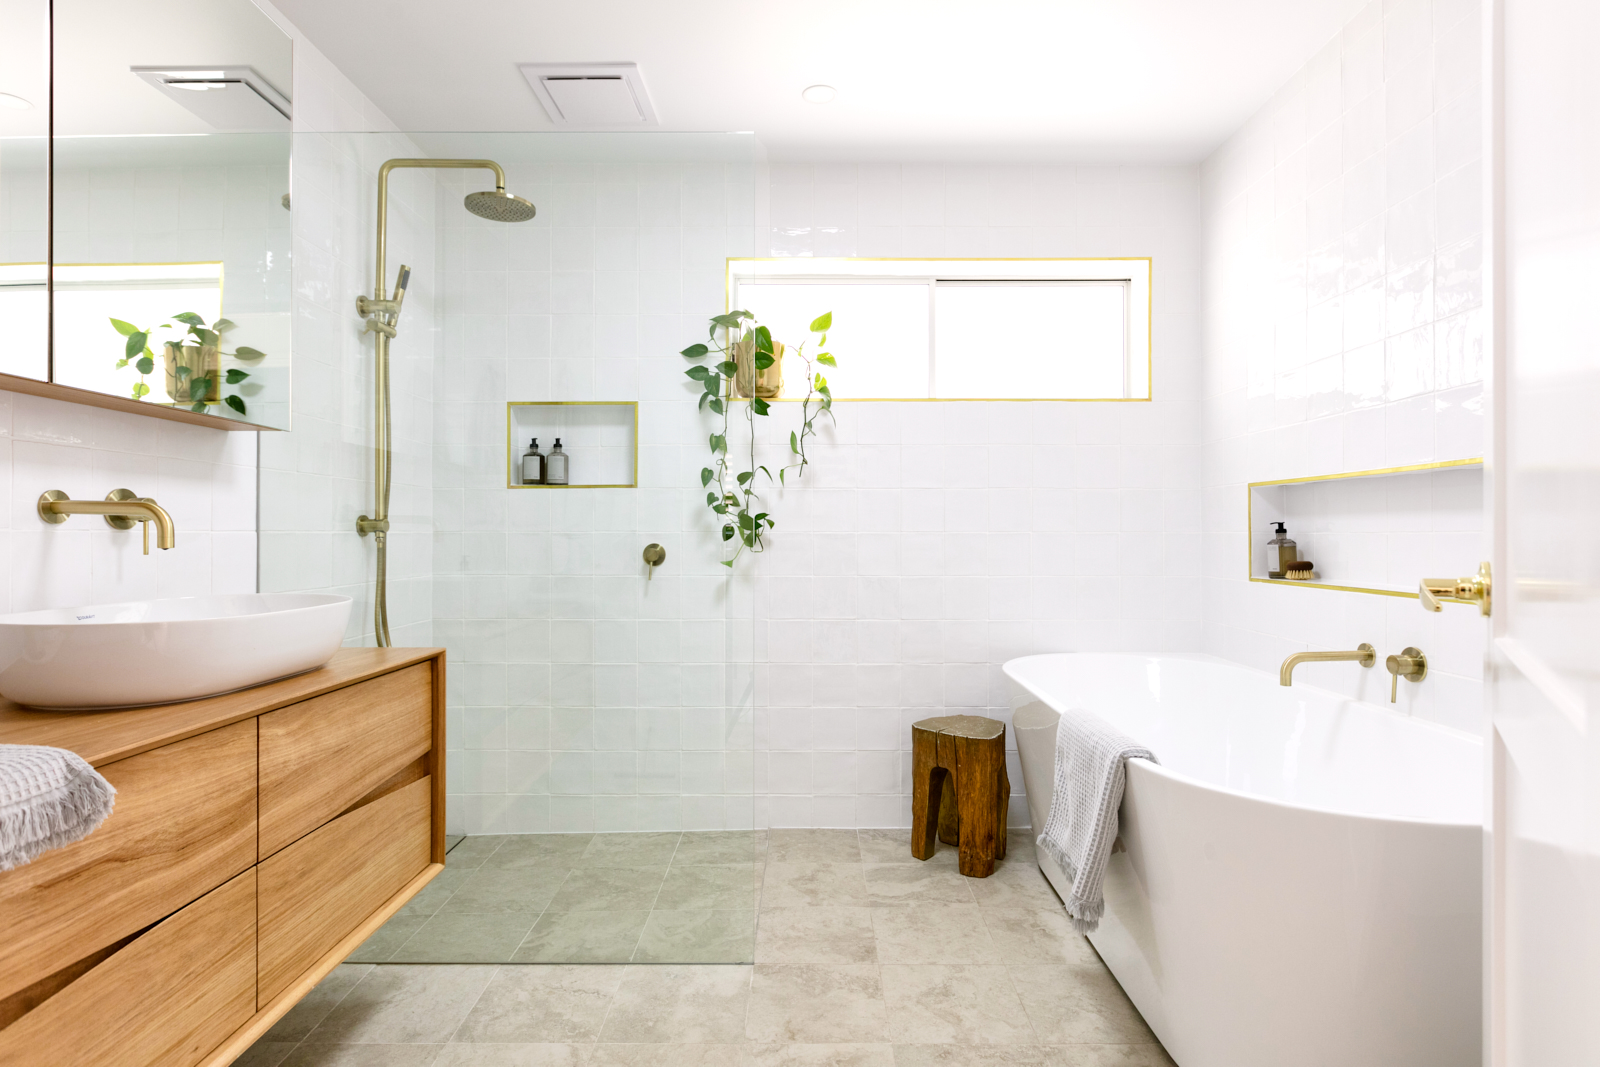
Today, I’m sharing our en suite, which probably involved the most thought, planning, work and money, of the three projects we completed just before Christmas. Funnily enough, this room was the most modern (I’m guessing an 80s/90s extension) of them all when we moved in. Which is pretty funny when you consider the before pictures below! Hello, beige and brown!

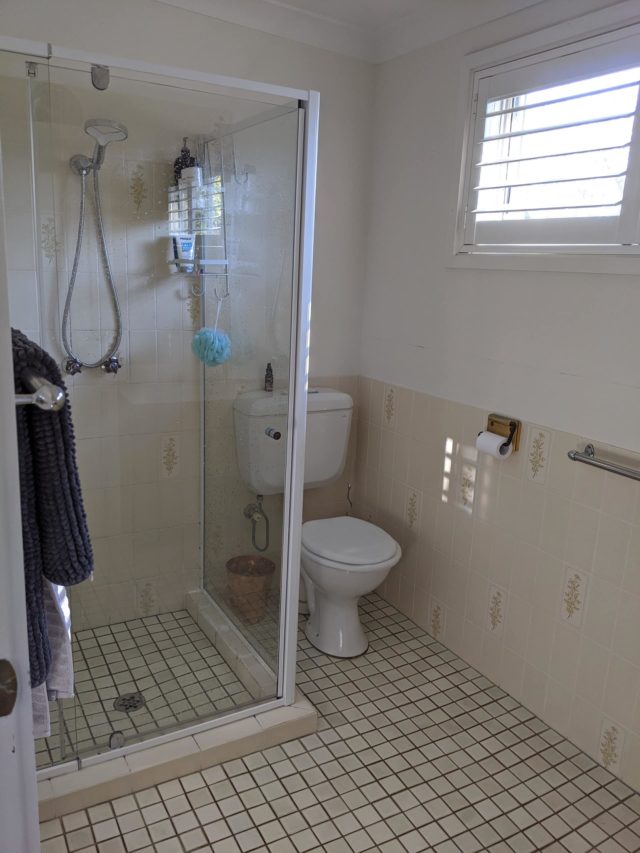
Bathrooms are, by their very nature, bloody expensive rooms! And while we did a complete rip out and re-do with our main bathroom, we didn’t have the funds (nor did we consider them worth spending) to do the same for our en suite. But after almost four years, we really wanted to finally finish off the two remaining very dated rooms of this “nanna house,” this and the laundry. They were definitely a couple of pimples on an otherwise pretty face!

Where the shower wall tiles meet the wall panelling

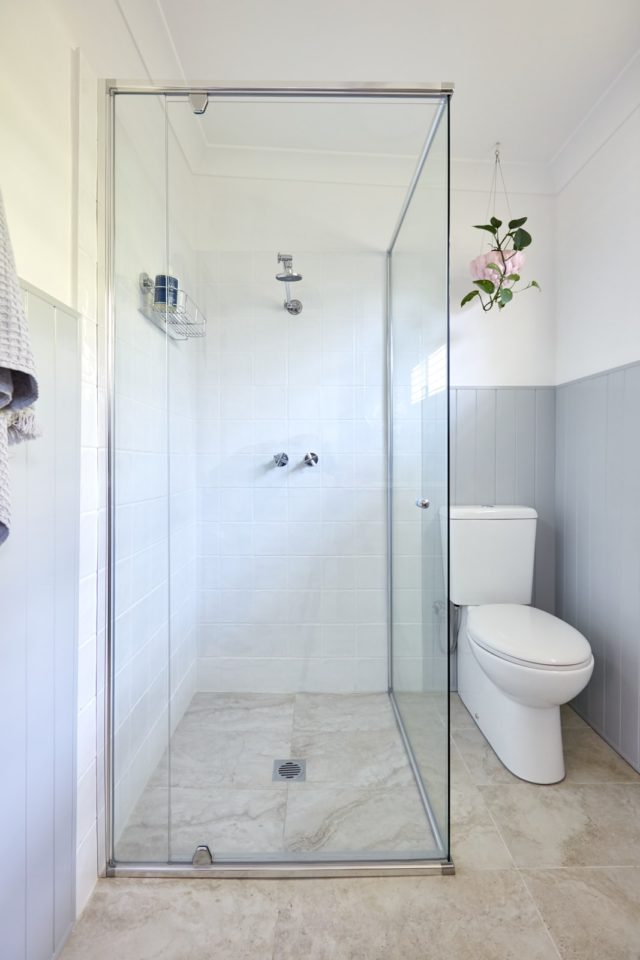
We all know tiles and particularly tiling, add up in a bathroom reno. In a bid to avoid some of this cost, as well as the time and mess involved in a “real” bathroom reno (I have limited patience!), we decided to tile over the existing tiles (which is perfectly fine to do if your tiles are sound), and we did that with the floor tiles. The new floor tiles from TileCloud are as similar as we could find to the ones we used in the main bathroom.

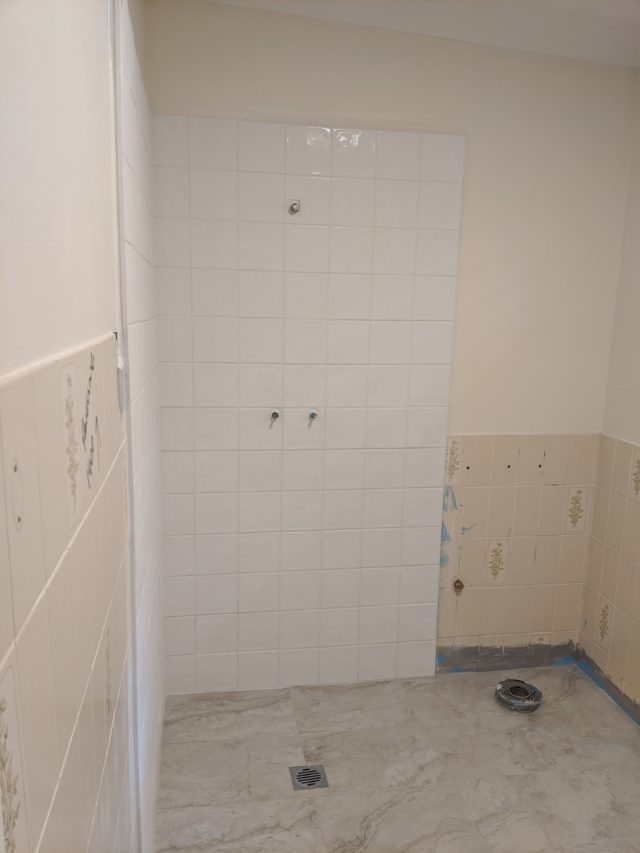
We never considered DIY-ing this part and left it to a professional tiler. And yes, we waterproofed underneath, especially as we also took the opportunity to remove the hob around the shower! It was reassuring to find a quality copper fold shower tray underneath! The tilers did our laundry and front porch at the same time which cost less than doing the three jobs separately.

These tiles are very similar to those in our main bathroom and I adore the texture

Despite this whole tile-on-tile situation making me stress out a bit over how it would come together, it all worked out really well. We also tiled over the tiles within the shower itself. Again, we chose tiles as similar as we could to what we used in the main bathroom, again from TileCloud, for some continuity, keeping it all very simple and clean.

No fancy in-wall cistern here, just a new, slimline toilet to save money!

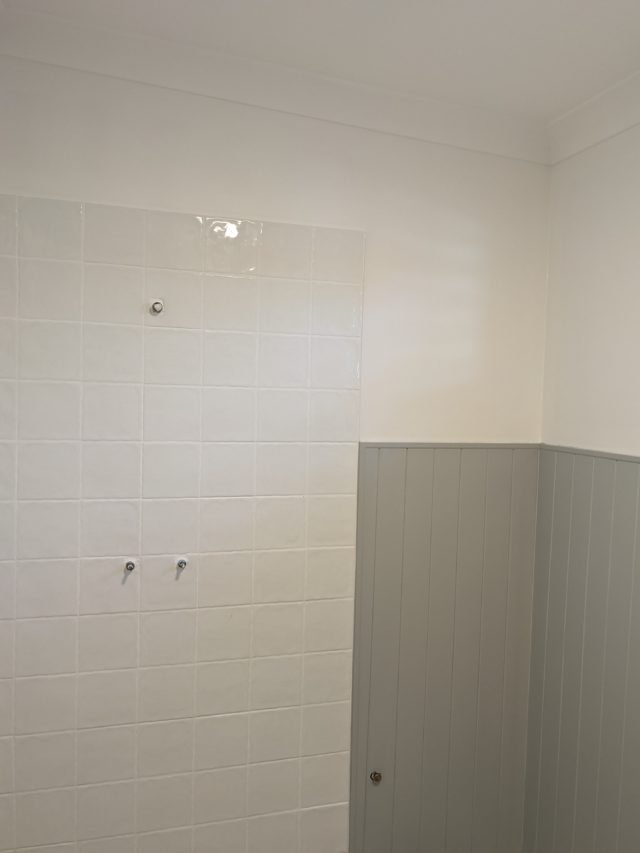
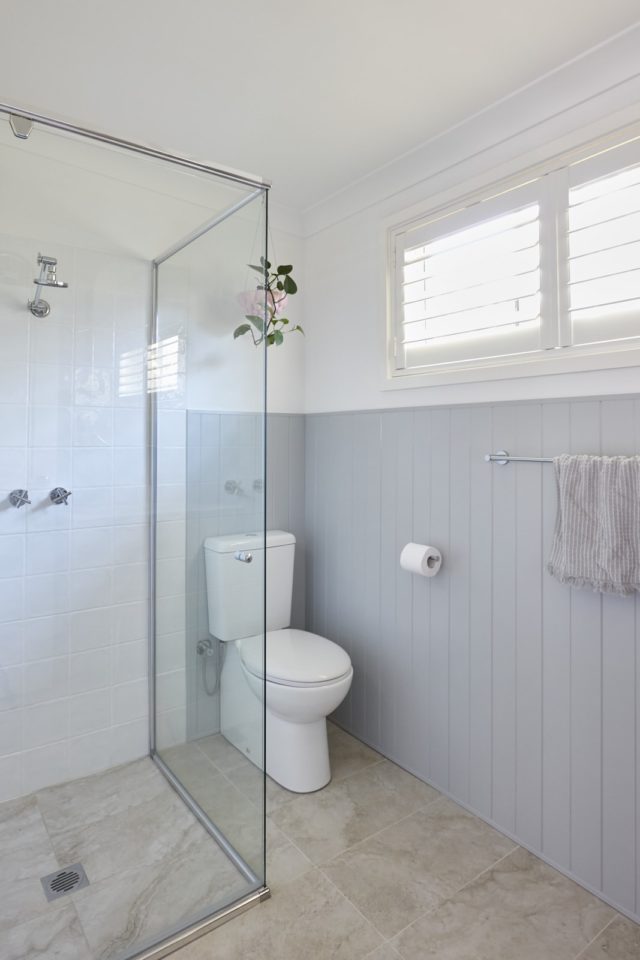
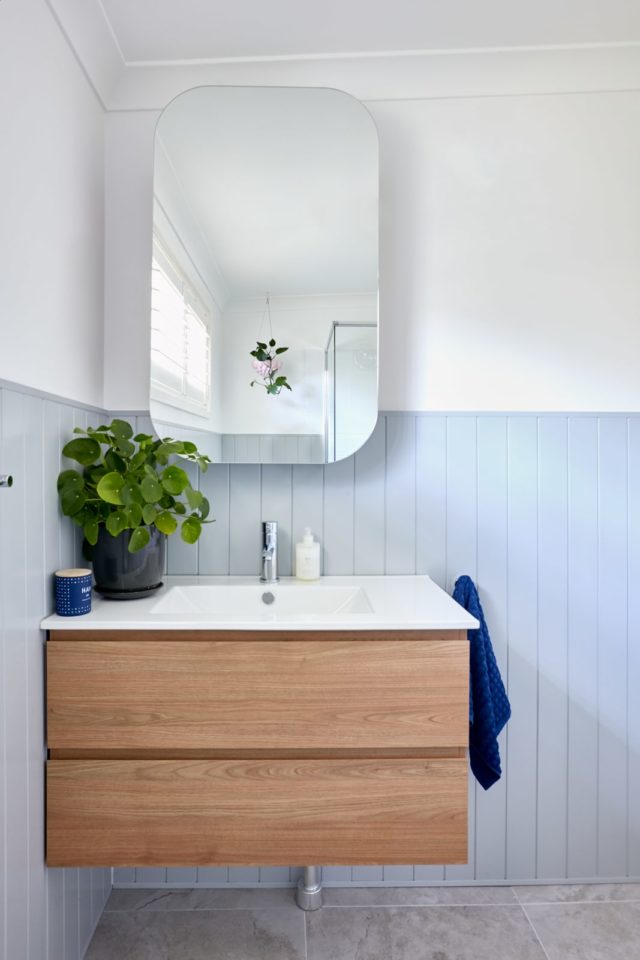
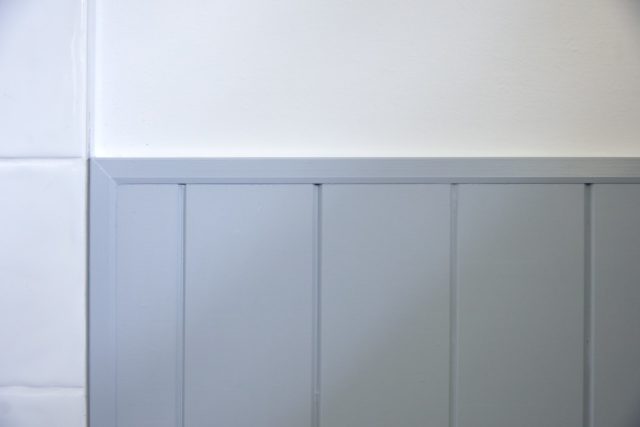
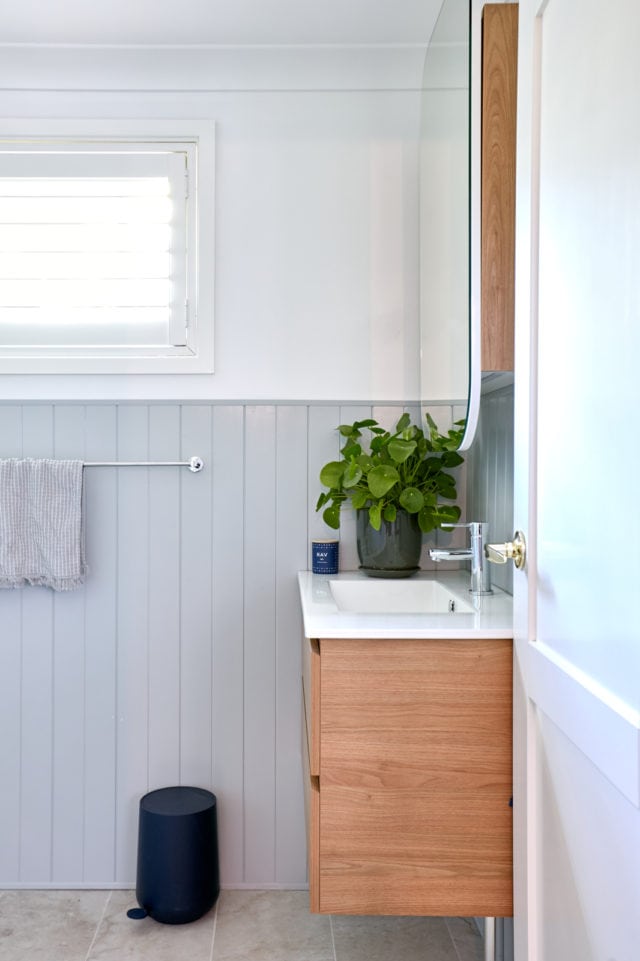
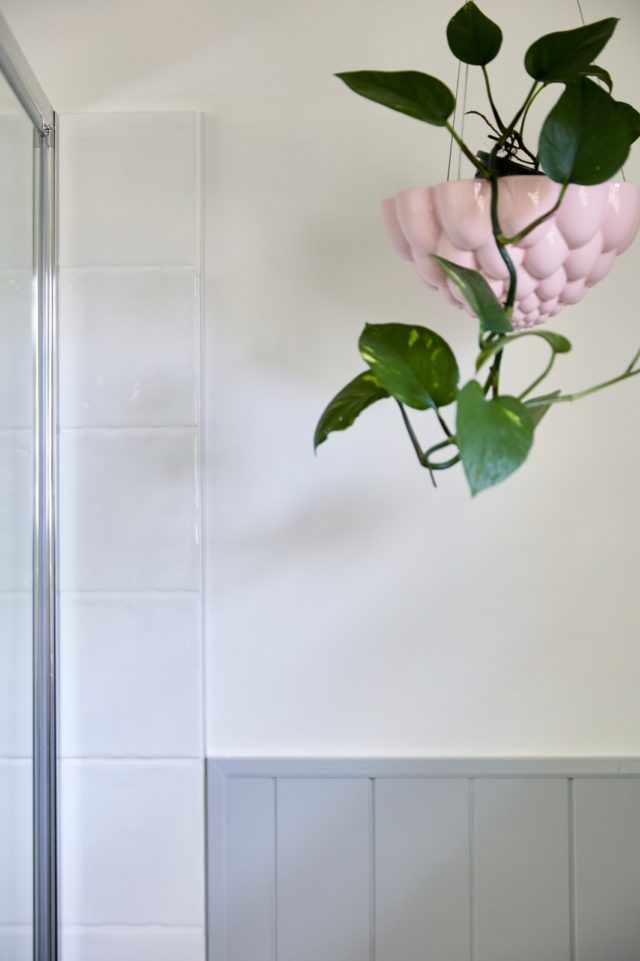
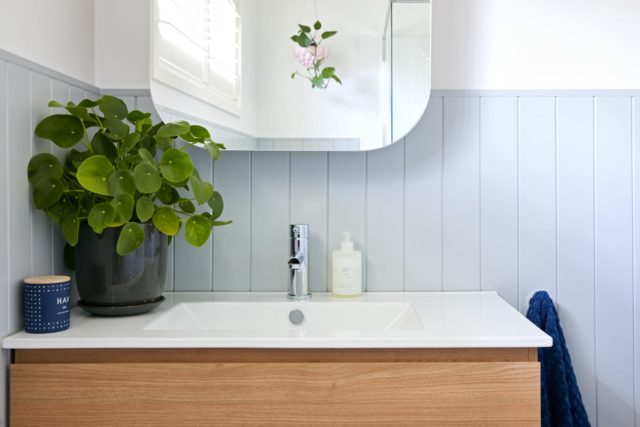
Where we really saved money (and also got a great look aesthetically), was in going over the remaining wall tiles with VJ panelling (which we painted the same blue/grey as the other VJ in our kitchen, dining and living rooms). While floor to ceiling tiles always look great, they’re really not that necessary unless you plan on throwing water around your room in a big way! And of course the cost of the tiles, and the tiler, adds up.

I initially planned for this paneling to be painted the same navy as our bedroom in order to achieve a nice flow from one room to the other, but I made a last minute call to go grey instead because I felt the dark blue would overpower the small room. I think this was a good call. The lesson learned here was not to feel you have to stick rigidly to your plan! Although we already had the navy paint and it feels a waste (I’ll find somewhere to use it with my love of navy!), we had leftover grey paint so thankfully it didn’t cost us any more.

We used clear silicone around the sink

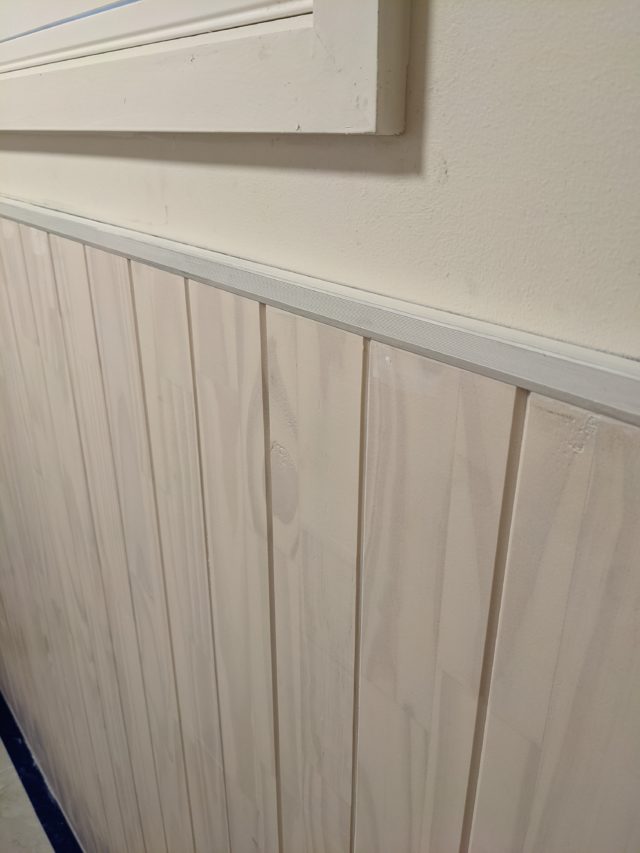
We didn’t use Intrim’s VJ Board Pro in here (like we used in the living room) because MDF and wet rooms are not a match made in heaven. Intrim advised that a much more sensible option was their timber lining boards (their LB03 lining board in 185mm wide panels) which click together and come pre-primed and ready to paint any colour you like.

We kept everything in the same spot, just replacing with new, to save time and money.

The trickiest part of this entire room was working out how to attach the lining boards safely to the wall, covering the tiles, and how and where the shower tiles would meet the panelling without looking clunky. Lucky I had my superstar tradesman Trent Ayton from Pure Renovation Group on hand to come up with the solution because I sure didn’t have a clue! He didn’t feel that simply gluing the panels onto the wall tiles and adding a chair rail was secure enough.

In progress

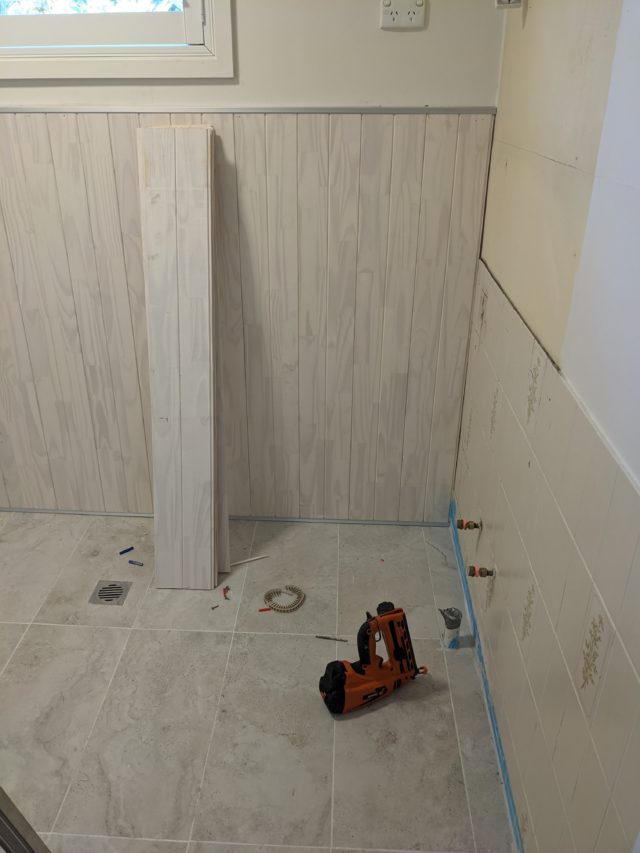
He explains: “We made sure the existing tiles were sound and cleaned them well. Then we used a U-shaped metal tile trim that was both glued and screwed onto the existing tiled walls, then fit the VJ using quality adhesive. We used the same trim top and bottom and painted this the same as the timber so it all blends in well and you don’t even notice it’s metal.”

Trent looked after everything except the tiling, plumbing and electrical (really just replacing light switches and sockets with new, disconnecting the old mirror light and connecting the new, under-vanity LED light. Trent also gave me very helpful direction on which trades I needed and when in the process, allowing me to confidently project manage the job myself and save a lot of money.

We had hoped to use a Bunnings off the shelf shower screen (we replaced what was there when we moved in with one of these because the door kept getting stuck!) but after tiling over tiles on the wall and floor, things were not plumb enough! So that cost us more than we hoped ($800) but having semi-frameless does look much more streamlined.

The LED light adds a touch of luxury in an otherwise quite basic en suite

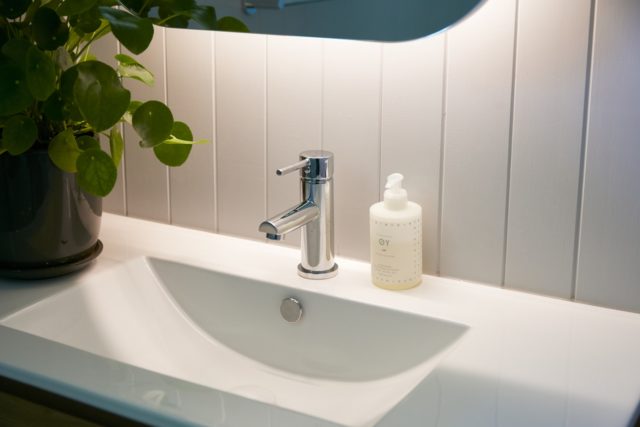
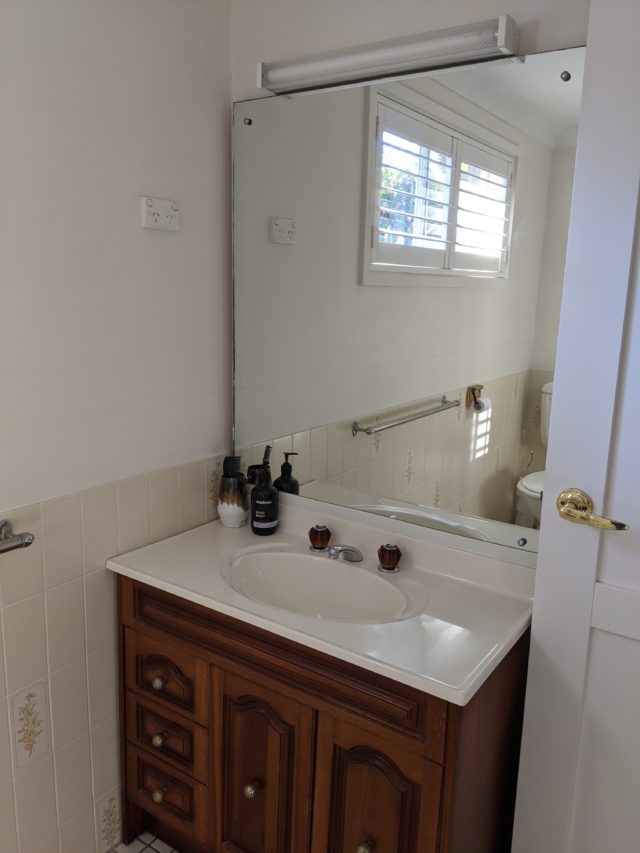
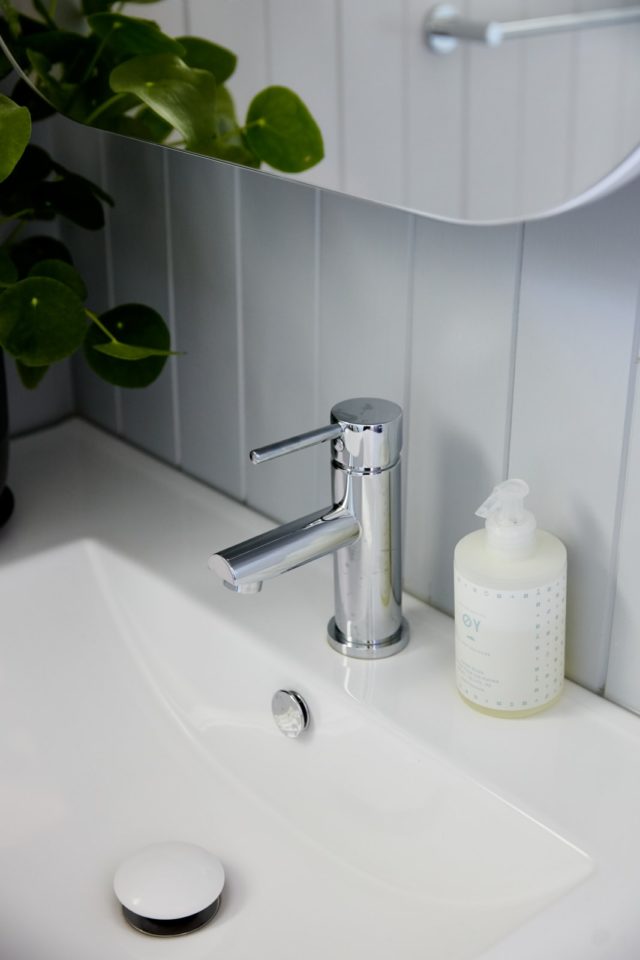
The look and feel of this bathroom is very clean, light and modern (but also quite classic!). I really love the look of the VJ panels and I feel we added some important warmth and a bit of wow-factor with the beautiful vanity and mirror cabinet (thanks to Matt Michel for suggesting this size and style and letting me bounce ideas!) from The Blue Space. I loved that we were able to customise these Timberline products online, choosing options like the LED lighting (which is perfect for going to the bathroom in the middle of the night!), a white ceramic waste (which we also have in the main) and the timber veneer colour, which I’m thrilled with. I also love how the timber veneer is the same on the outside of the mirror cabinet to match the vanity below. It’s a very similar look to our more expensive solid timber vanity in the main bathroom.

I much prefer the view from our bedroom now!

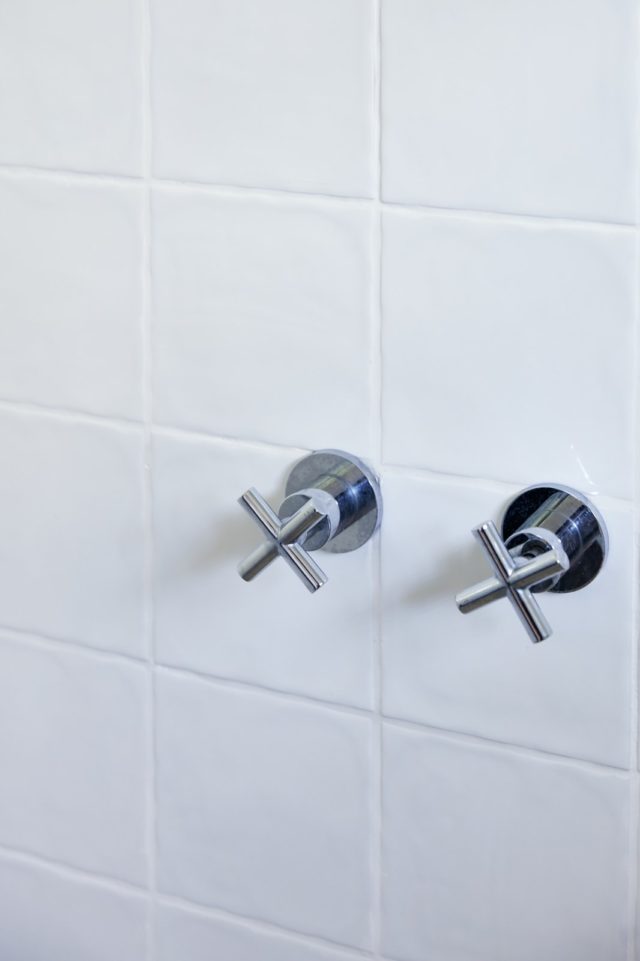
We decided to use chrome tapware rather than matching the brass in the main bathroom, mainly to save money on having to replace the shower, and gold shower options are limited. We also avoided moving any plumbing unless we really had to (we had to move the plumbing up behind the vanity because we replaced a floor standing one with a floating option). We chose Meir tapware though, as we have for our kitchen, laundry and main bathroom, because we love the look and quality and it provided continuity in style if not colour. The wall hooks, towel rail and toilet roll holder are also from them.

I am delighted to say someone took the old vanity off our hands via Freecycle (who doesn’t hate landfill?) although the same cannot be said for the old toilet with the padded seat!

To avoid drilling into two layers of tiles (nerve-racking much? Plus, maintaining the integrity of the waterproofing), I researched the suction options and this Fusion-Loc brand from Bunnings (about $40) gets rave reviews, actually stays on, doesn’t rust and looks pretty good for a stick on option!

Every decision we made with this bathroom was a careful weigh-up between aesthetics and cost. This bathroom is not the showstopper the main bathroom is, but it wasn’t intended to be and frankly, we didn’t need it to be. We do really love it though, and the colour palette means it’s really light and bright, a far cry from the beige and brown!

However, as it didn’t end up being a navy bathroom to tie in with the navy master bedroom, I’m now thinking about re-painting the bedroom the same blue-grey to tie it back in with the bathroom (It never ends in this house!)! I have loved having a dark and moody bedroom but maybe I’m ready for a change! Dark walls also show up dust!

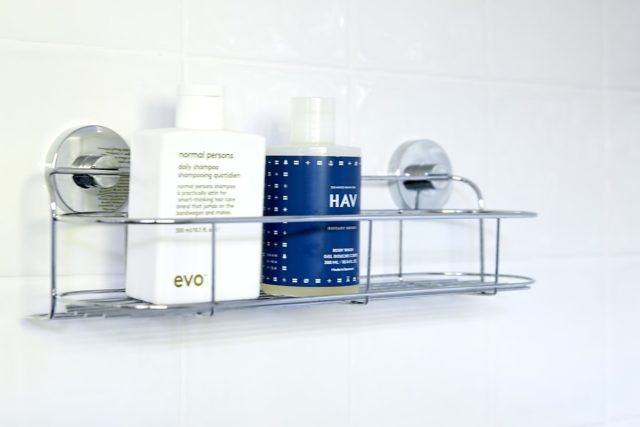
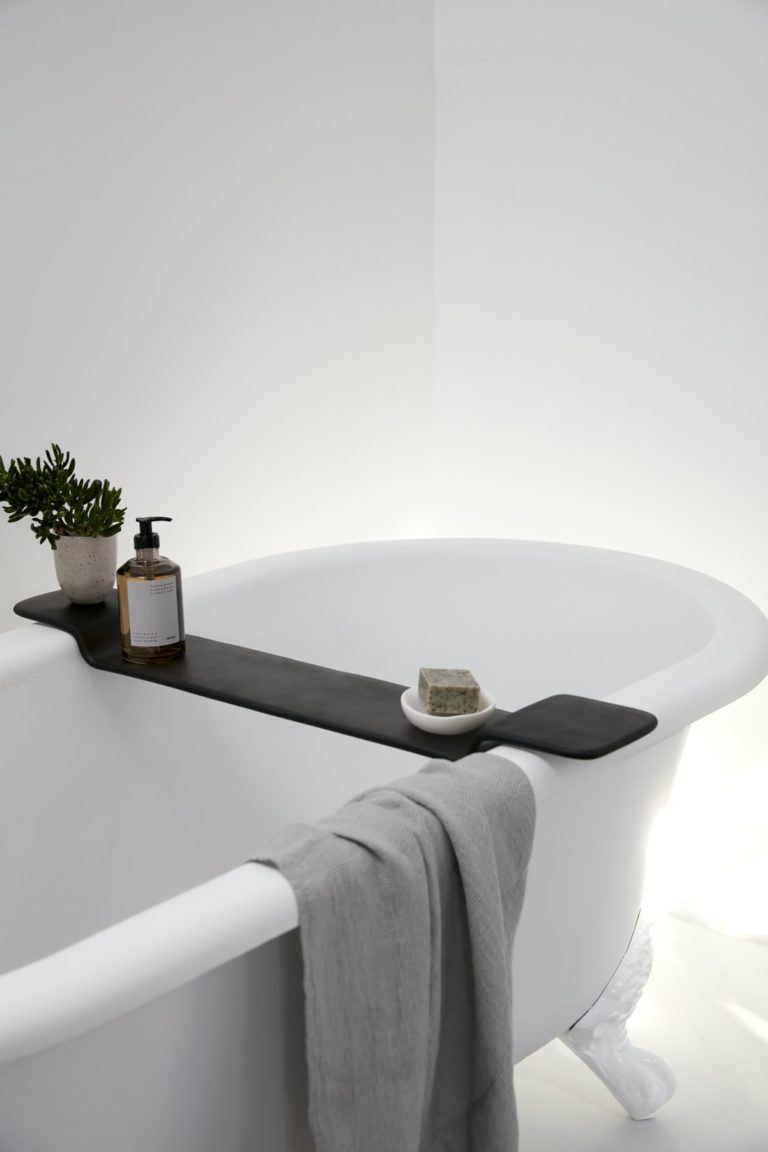
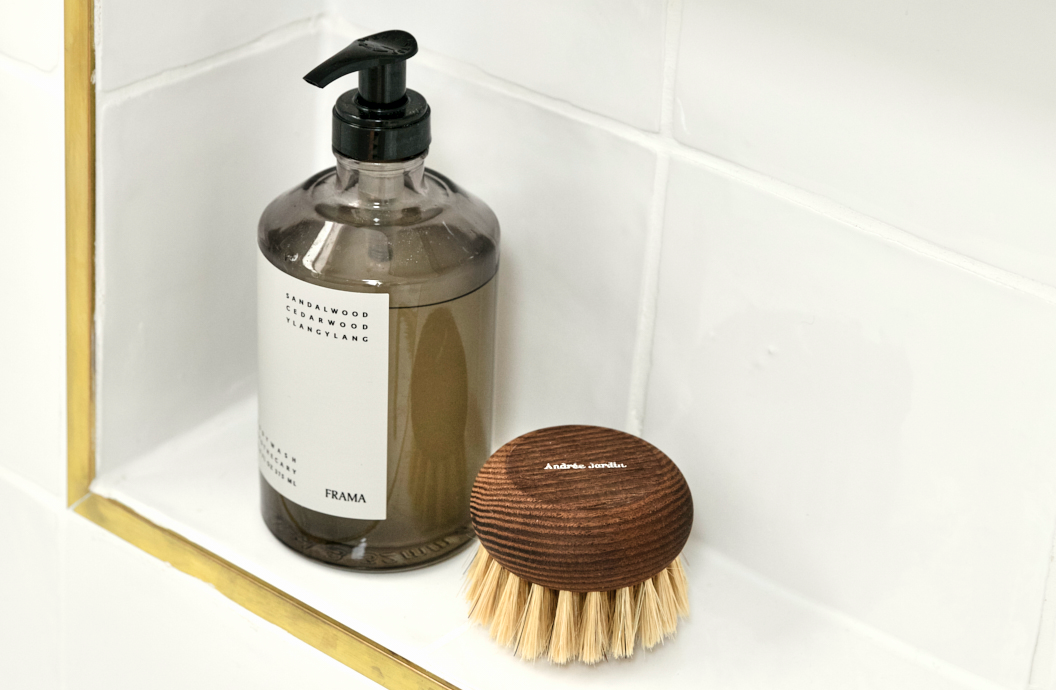
We finished off with a few accessories from my favourites Oliver Thom, including the navy Zone bin, Skandinavisk toiletries and Norm toilet brush. The Angus & Celeste pink jelly planter was a Christmas gift from my dad and adds a nice pop of colour.

We are replacing our old windows later this year and I’m looking forward to swapping the older sliding window (nicely hidden behind the shutters) with louvres. At this point, I’ll probably ditch the shutters as privacy and keeping light out aren’t considerations and louvres and shutters would be a bit much. What do you think?

I hope you get some ideas from our semi-budget en suite reno! Feel free to ask any questions in the comments!

The finer details

Vanity: 900mm Timberline Nevada Plus Wall Hung Vanity with Alpha Ceramic Top from The Blue Space.

Mirror cabinet: 600mm Timberline Jazz Arch shaving Cabinet from The Blue Space

We chose the Tasmanian Oak Woodmatt finish for both the above

Tiles: (Floor) Byron Travertine Look Ivory Matt and (Wall) Newport Gloss Large Square from TileCloud

Wall panelling: Intrim’s LB03 lining board in the 185mm wide panels

End trim to fix the panels to the wall: Roberts 12mm x 3.3m end trim from Bunnings

Paint: Chinchilla Fur in semi gloss from Haymes Paint (panels) and Light Frost by Haymes Paint (walls).

Taps, towel rail, robe hooks and toilet roll holder: from Meir

Trades: Pure Renovation Group

Accessories: Oliver Thom and (towels) Aura Home.

My new navy and gold laundry revealed: before and after
Our kitchen was the very first room we renovated in this house, almost four years ago. It was a case of “I’m not buying the house unless we can afford…
Interiors Addict bathroom reveal: before & after
You know that old cliché about saving the best until last? I think we may have just done that with our family bathroom! This was the last major (indoor) project in our…
Bath caddy
Designer toilet brushes and bins the new must-haves for a stylish bathroom
While Australia’s homewares scene has continued to dramatically improve over the years, when it comes to bathrooms it can still be a little tricky to find stylish wares to put…
The best-looking pump handwashes for your bathroom
Give it a few weeks and a bar of soap can quickly become an off-colour, grimey mess (and their hygiene factor has to be a bit questionable, right?!). But the right…

FacebookPinEmailTweet

Primary Sidebar

Popular This Week

  • Serial renovators embark on 15th house and this one’s for keeps!
  • Room reveal: my new lighter, brighter master bedroom + shop it!
  • Australian kitchen dimensions: standard sizes for every last detail
  • Palette Cam 15 apps to help you build your dream home
  • Hard to sell house transformed into forever home

Follow us on Instagram

Seeing double Seeing double
Dream breakfast right there!🥑 Featuring my fav Dream breakfast right there!🥑

Featuring my favourite @thewholefoodsrefillery product EVER, mild chilli nut butter. Get the recipe and your code for 20% off your first order with them, on the homepage now, via link in bio.

#notsponjustmyfriendsanddeliciousqualityfood #iafoodiefriday #avotoastagram #nutbutters #avocadoporn
When interior designer @sarah_yarrow was renovatin When interior designer @sarah_yarrow was renovating her 50s home to sell she was determined to move away from the cookie cutter flip to sell look and went for something warmer, paying homage to its roots.

"People are much more likely to connect with something that feels warm and friendly and that doesn’t feel like the home up the street, or the one that their friend has just bought. And once they connect, they usually pay more,” she said. Sarah believes people usually crave a homely feel but don’t know how to create it themselves

See the whole home before and after on the homepage now via link in bio.

Pic: @the.palm.co 

#beforeandafterrenovation #beforeandafterremodel #homelyhome #vjwalls #wallpaneling #bedheads #headboards #bedroomlighting #modernfarmhousedesign
This is the pits. Geddit?! 😆 This is the pits. Geddit?! 😆
This family home is next level. Literally! A stee This family home is next level. Literally!

A steeply sloping block isn't a typical prerequisite when building a new home. But it was for Perth architect Sam Klopper and his family who desired an elevated balcony (hello roof terrace!) AND a back yard that was accessed from the living area. And wow, they sure made the best of it!

Take the tour on the homepage now. Via link in bio.

#roofterrace #roofgardens #slopingblock #architectshome #perthhome #wahomes 

Project: @klopper_davis_architects
Photos by @dionrobeson
Before & after goodness alert ⚠️ Head on ove Before & after goodness alert ⚠️ 

Head on over to the blog this morning to meet serial flippers @renowayoflife Back in Australia after more than a decade renovating for profit and living debt and mortgage free in the UK and USA, they're onto their 15th house, a Queenslander, and this one they plan to actually keep and live in with their 3 kids!

It's an inspiring tale and we're sharing before and afters of 3 of their previous projects. Looking forward to sharing the progress of their current house in the coming weeks and months too 🤗

Via link in bio💛

#queenslanderrenovation #houseflippers #serialrenovator #renowayoflife #queenslanderhome
How's that for a pool?! This Noosa riverfront ab How's that for a pool?! 

This Noosa riverfront abode just won Home of the Year in the 2022 HIA-CSR Australian Housing Awards. 

Take the tour and find out why. On the homepage now via linknin bio.

#poolsofinstagram #poolhome #swimmingpooldesign #houseoftheyear #riverfronthomes 

@jwconstructions @shaunlockyer @christopherfrederickjones
(WIN!) It's not the weather to have damp washing e (WIN!) It's not the weather to have damp washing everywhere!

Let's make your life easier with this amazing laundry prize from @hillshomeliving 

One lucky winner will get a bamboo concertina, a bamboo sorting centre and 3 bamboo foldable baskets worth almost $250.

For your chance of winning follow us and @hillshomeliving and tag a friend below by midnight Sydney time next Friday 27 May. One entry per person.

The concertina and sorting centre are available at Big W and the baskets at Bunnings.

Open to Australian residents only. Not affiliated with or endorsed by Instagram.

#laundryinspo #laundryideas #laundryday
We've entered an exciting phase in our home: non-s We've entered an exciting phase in our home: non-synthetic rug land!

With two young boys, I've always advocated for the synthetic and easily scrub-cleanable rug! Now they're a bit older and observing the shoes-off and no-food-in-the-living-room rules, I thought it was time! And I'm in love with our bold new @castleryau Lorenzo Wool Rug.

You can't beat the luxurious look and feel of wool and I've also stepped outside my comfort zone with a design that stands out rather than blends in. Get me!

Can someone remind the kids about the keep-the-toys-in-the-playroom rule though?!

Would you be brave enough to go for a cream wool rug in your house?!

This rug is on display at Castlery's popup at Moore Park SupaCenta until October. 

#athomewithcastlery #rug #interiorsaddictfamilyhomereno #statementrug #gifted
Follow on Instagram
Visit Jen's profile on Pinterest.

Get Your Free Ebook

Ebook cover

Never miss the latest renovating and interiors products, news and inspo again! Sign up for our newsletter and we'll send you the best bits from the blog, direct to your inbox. Plus you'll get our latest eBook: What Made The Biggest Impact in Jen's Own Reno.
This field is for validation purposes and should be left unchanged.
Avatar

About Jen Bishop

Jen Bishop is our owner and publisher and an experienced journalist and editor. Interiors Addict has been her full-time job for more than 8 years. She is married to Damian and mum to Sebastian and Charlie.

More from Bathrooms

Kitchen

Laminex woodgrains look super sophisticated in latest collab

Bathroom trends 2022: experts share what’s in and out

How to add character and warmth to a new bathroom

Lounge room

Red brick Federation Sydney home now features pops of navy

Just in Place

Unique one-stop bathroom & kitchen reno business in Sydney

Concrete and terrazzo star in Highgrove Bathrooms’ latest

A timeless new range from Freedom, designed for Aussie living

Wattyl & Caesarstone make perfect pairings easy

The 2022 bathroom: innovative, water efficient & nature inspired

Reader Interactions

Comments

  1. AvatarArthur says

    February 24, 2021 at 8:32 am

    Really nice outcome and the tiles and panel combination worked out well.

    Reply
  2. AvatarLisa says

    February 24, 2021 at 3:59 pm

    Jen I really enjoy reading your reasoning and decision-making, as well as seeing the beautiful photos. So helpful and inspiring!

    Reply
    • AvatarJen Bishop says

      February 24, 2021 at 4:14 pm

      Oh I’m so glad! I want it be helpful and give ideas! Thanks for the feedback.
      Jen

      Reply
  3. AvatarAlison says

    February 25, 2021 at 12:17 pm

    Love this bathroom – so pretty! Could you please tell me how high you went with the VJ as I’m quite inspired to use it in the bathroom reno I’m planning.

    Reply
    • AvatarJen Bishop says

      February 25, 2021 at 1:28 pm

      About 1400mm from memory, but decided purely by how high the tiles were that we were covering (they were higher on the wall opposite the window wall and we went the same height all the way around the room for uniformity). Glad you like it, thanks!

      Reply
  4. AvatarChris says

    April 13, 2021 at 12:29 pm

    I’m concerned that the VJ around the sink is going to cause issues with splashing. Note we have 5 boys! Our builder said we must have a spashback above the sink to avoid issues. Has any mould moved in around the sink?

    Reply
    • AvatarJen Bishop says

      April 14, 2021 at 2:38 pm

      Hi Chris!
      No mould! Obviously you still need to silicone properly! I’ve seen plenty of examples of a VJ splashback recently which made me more confident! There’s also a VJ product specifically for bathrooms from another brand. I think it’s becoming more common. Also bear in mind that enamel paint rarely goes mouldy. I’ve never seen it!

      Reply

Leave a Reply Cancel reply

Your email address will not be published. Required fields are marked *

Recipe Rating


Footer

Interiors Addict

Interiors Addict

  • About
  • Contact
  • Work with Jen
  • Press
  • Jobs
  • Privacy Policy
  • Disclosure Policy

Browse

  • RENO ADDICT
  • Jen’s Reno
  • House Tours
  • Real Renos
  • Interviews
  • Styling
  • Designers
  • Bedrooms
  • Covet My Coffee Table
  • Expert Tips
  • The Block
  • Art
  • Furniture
  • Recipes

Follow Us

  • Facebook
  • Instagram
  • Pinterest
  • RENO ADDICT

Copyright © 2011–2022 Addicted Media Pty Ltd
Website care by ClickWP · Log in

Share this ArticleLike this article? Email it to a friend!

Email sent!