• Skip to primary navigation
  • Skip to main content
  • Skip to primary sidebar
  • Skip to footer

The Interiors Addict

Heart Your Home

@interiorsaddict on Instagram   @interiorsaddict on Facebook   @interiorsaddict on Pinterest  
Subscribe
  • Job Board
  • About
  • Before & Afters
  • RENO ADDICT
  • Kitchens
  • Bathrooms
  • Kids Rooms
  • Bedrooms
  • Living Room
  • Shopping
  • Expert Tips
  • Recipes
  • Parenting
  • Travel
Interiors Addict
  • Job Board
  • About
    • Our Story

      Australiaโ€™s largest interior design, styling and renovation blog for the everyday Aussie. By former journalist and magazine editor Jen Bishop, the original interiors addict!
      READ MORE

      Weโ€™re big on Instagram!
      @interiorsaddict

      • About
      • Contact Interiors Addict
      • Work with Interiors Addict
      • Advertise / Find a job in Interiors
      • Press
      • Get Your Free Ebook

        This field is for validation purposes and should be left unchanged.
    • bookcover-jens-reno
  • By Room
    • Browse by Room

      Where you can search for all our posts about a specific room. Only interested in kitchens and bathrooms? We got you!

      • Kitchens
      • Bathrooms
      • Kids Rooms
      • Bedrooms
      • Living Room
      • Home Office
      • Dining
      • Laundry
      • Outdoor & Exteriors
      • Renting
    • bookcover-jens-reno
  • Before & Afters
    • Before & Afters

      Who doesnโ€™t LOVE a good before & after? If you want to be inspired by the whole reno process, and not just the shiny photos at the end, this is the place for you!

      View Articles

      • Before & Afters
      • Jen’s reno
      • Real Renos
      • RENO ADDICT
    • AFTER kitchenBefore & after: Hunting for George’s latest transformation
    • AFTER front elevationDated Sydney Hills District home given new life
  • Reno Addict
    • RENO ADDICT

      Looking for reno inspo? Find it all here, from other peopleโ€™s projects to the latest trends, tools and products, whether youโ€™re DIY-ing or employing trades.

      View articles

      • Reno Products
      • The Block
      • DIY
      • Reno Trends
      • Before & Afters
      • Real Renos
    • LMX_Surround-May22_Batten-75_210-2_add-skirt-lhsNew water resistant wall panels from Laminex
    • AFTER kitchenBefore & after: Hunting for George’s latest transformation
  • Shopping
    • Shopping

      Want to know where to buy the latest furniture, homewares, rugs, art and more? Weโ€™re always sharing our latest finds and telling you where you can buy them.

      View Articles

      • Furniture
      • Homewares
      • Art
      • Smart Home
      • Appliances
      • Reno Products
    • image014Catherine Martin’s new carpets are as stunning as her film sets
    • MHP_290817-9What you should snap up in Contents ID’s bi-annual sale! + win!
  • Inspiration
    • Inspiration

      While Jenโ€™s a legitimate interiors addict, sheโ€™s no design professional, so she calls on an army of the countryโ€™s best to share their expertise with you. Be inspired by their stories too!

      View Articles

      • Decorating 101
      • Interviews
      • Expert Tips
      • Before & Afters
      • House Tours
      • Designers
      • Styling
      • Renovating
      • Real Renos
      • Covet my coffee table
    • Decor + DesignDecor + Design is less than two weeks away in Melbourne
  • Lifestyle
    • Lifestyle

      Weโ€™re mostly about the home but Jen also likes to share other things she thinks youโ€™ll love, like food and travel.

      • Recipes
      • Travel
      • Parenting
    • Screen Shot 2022-03-15 at 5.02.31 pmFoodie Friday: Lemon & pink peppercorn spritz
    • Isla-MotelHip new motel renovation on NSW South Coast
  • Jobs
    • Advertise on our job board
    • Job Board FAQs for advertisers

Weaving tutorial: create your own wall hanging

April 20, 2015 7 Comments

FacebookPinEmailTweet

Whenย Amanda Oโ€™Sullivan shared one of her beautiful woven wall hangings during our 7 Vignettes contest on Instagram earlier this month, she wowed plenty of our readers. So we were delighted when she agreed toย put together this great tutorial for us.
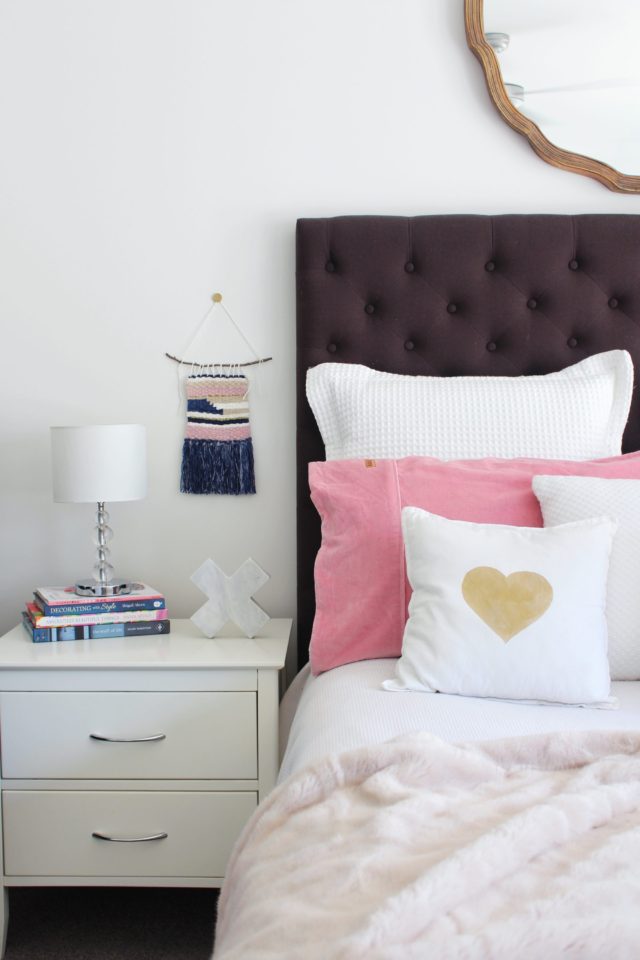
WeavingStyled1

There’s a weaver fever going around right now! If you are excited about weaving being cool again and youโ€™re keen to try making your own woven wonder, you will be happy to hear that itโ€™s not that hard. While it may look complicated, all you need are a few simple techniques under your belt and youโ€™re ready to create your own beautiful wall hangings. Donโ€™t despair if you havenโ€™t got a loom, because you can make your own from an old frame or even a piece of sturdy cardboard. Today, I’m going to share the basic skills you will need to know to create your first wall hanging. Enjoy!

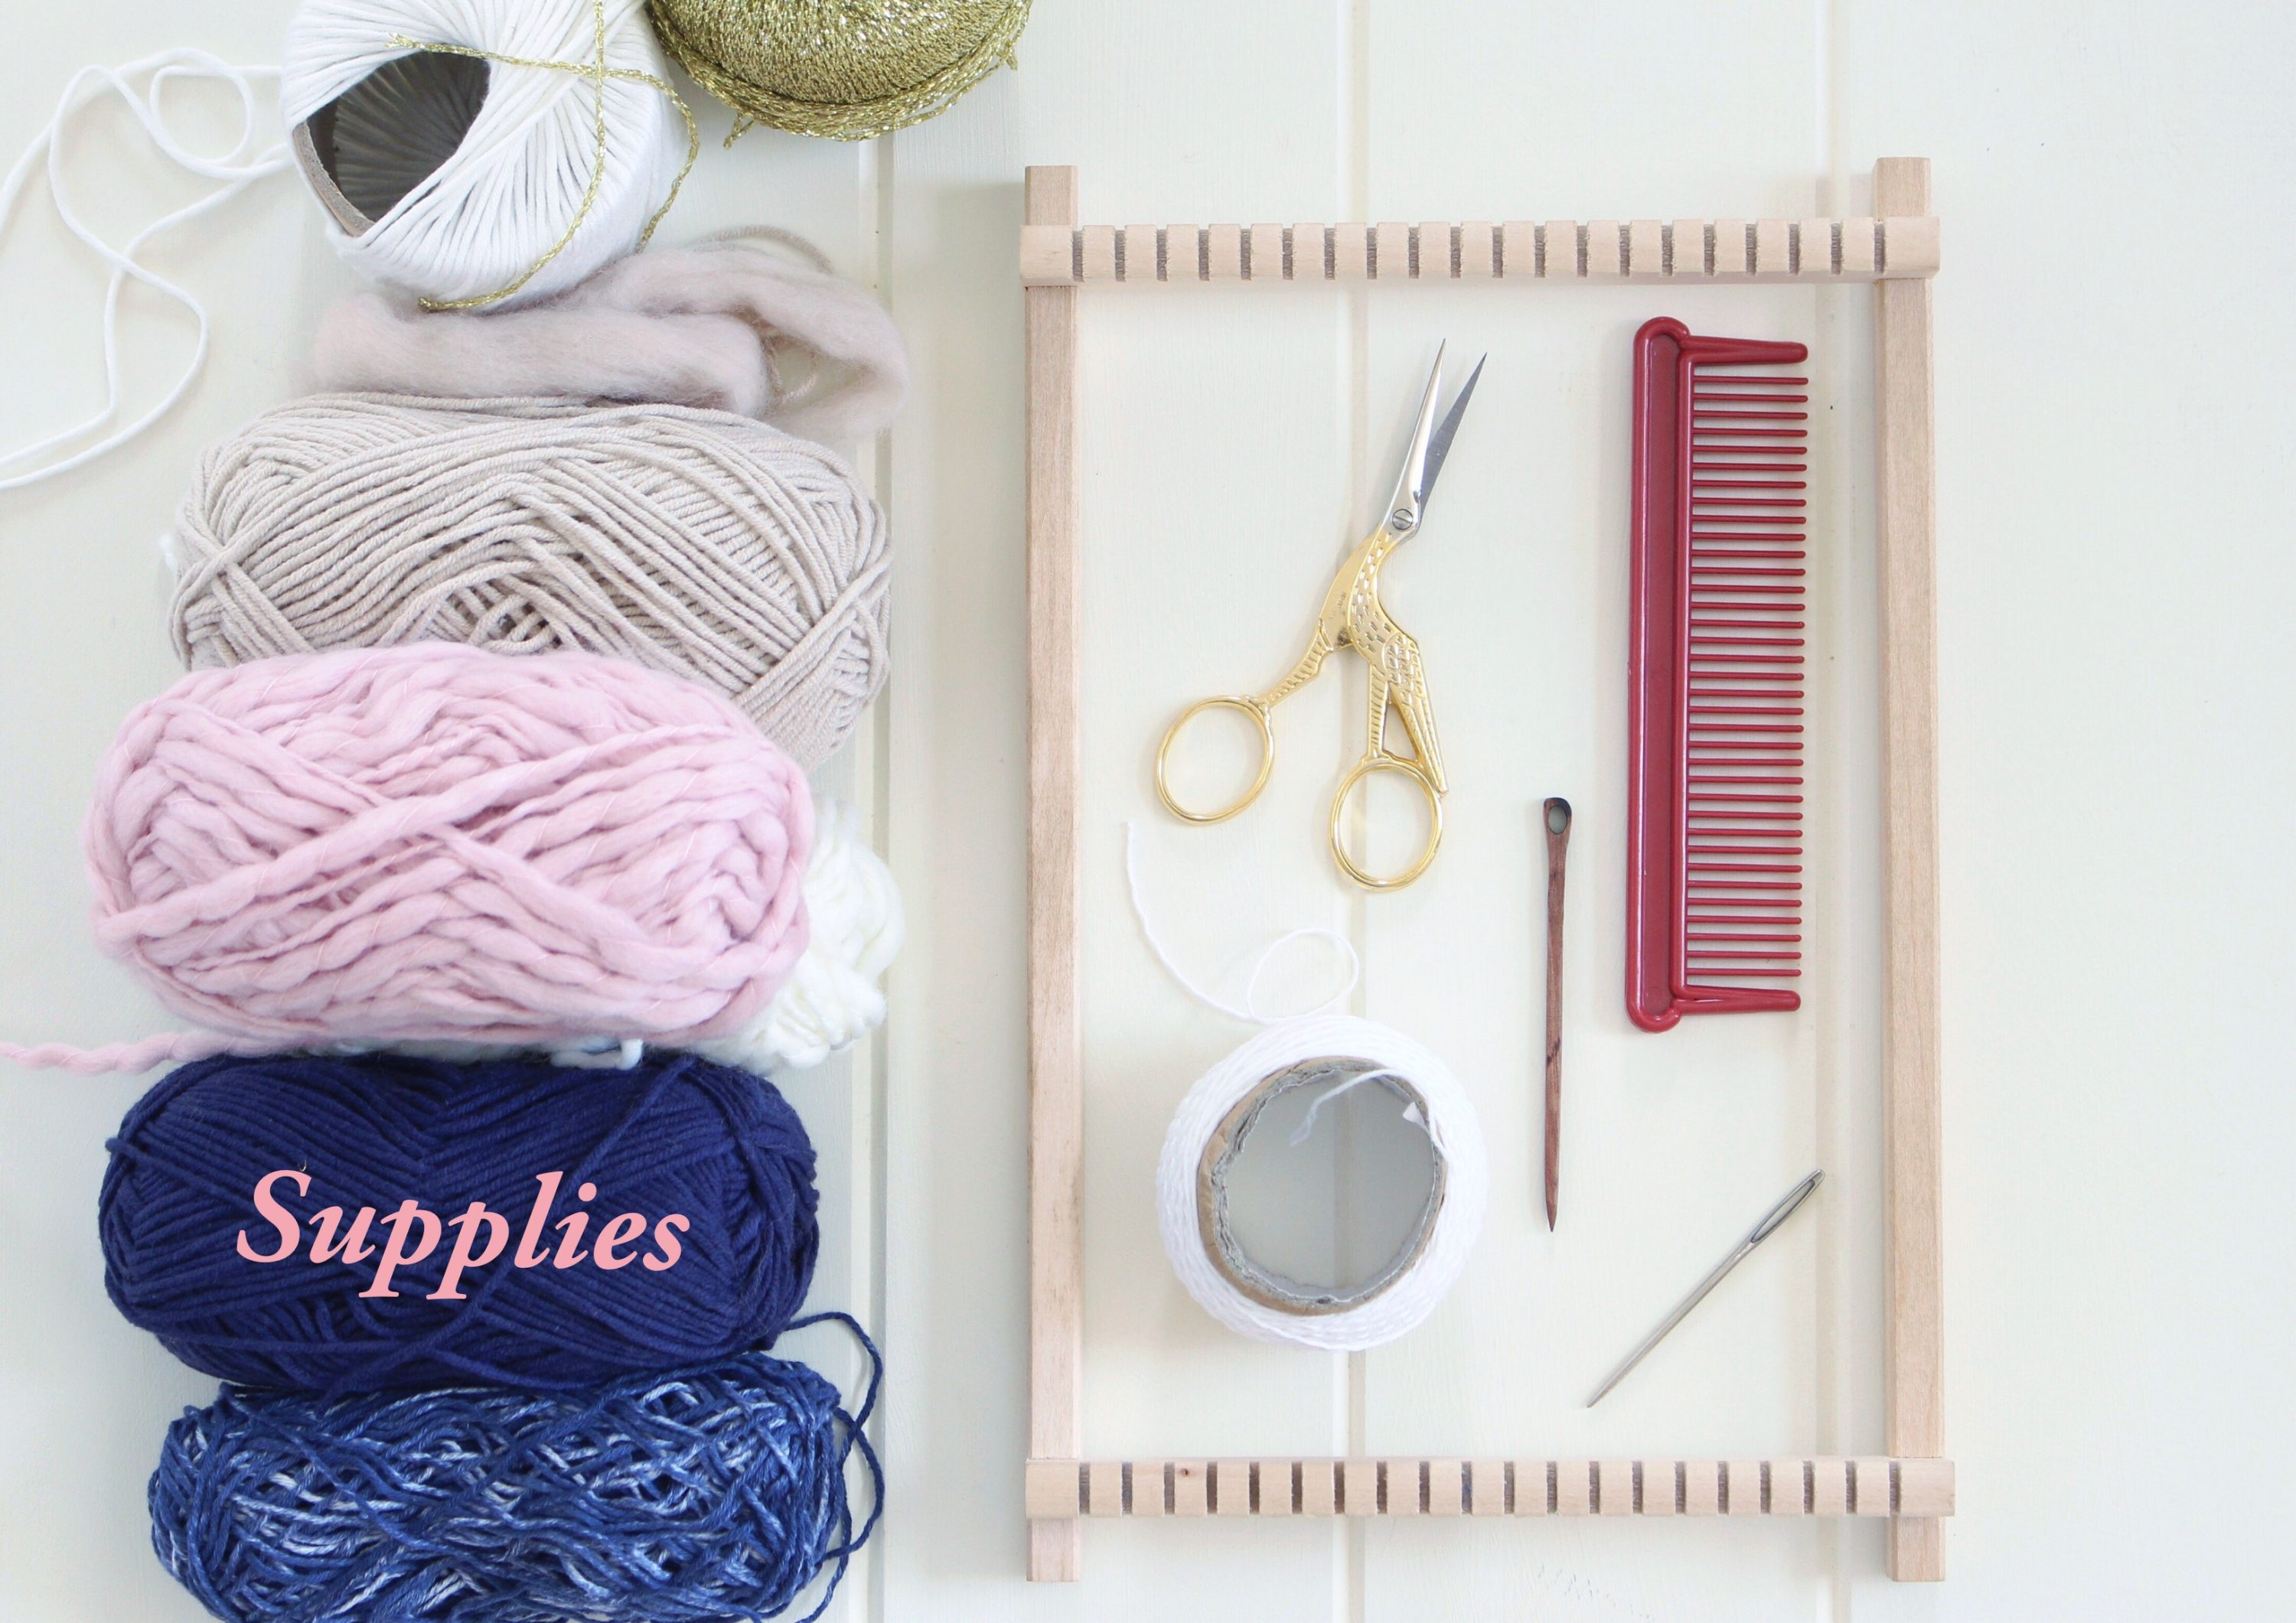
What you’ll need

WeavingSupplies

  • Lap loom
  • Wide tooth comb
  • Strong cotton for warping
  • Various yarn and fibre for the weft (the weaving threads)
  • A weaving or tapestry needle
  • Scissors
  • A stick or rod for hanging.

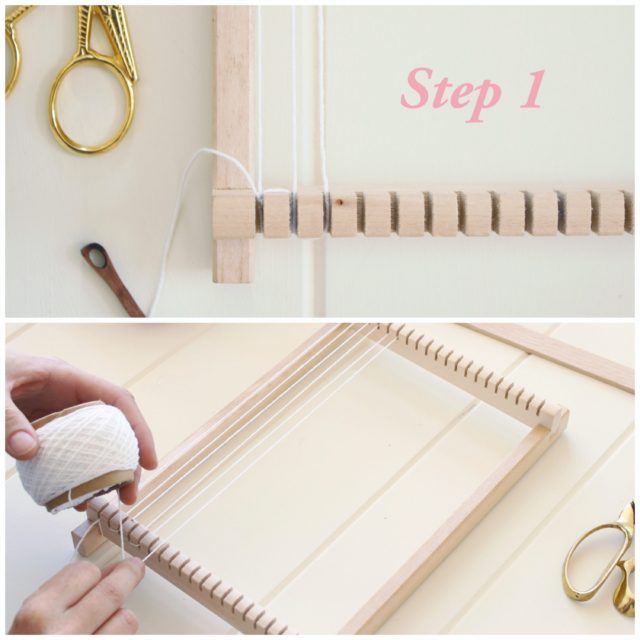
Step 1: Let’s get warping! Warp is the term used for the strong cotton threads that run up and down vertically on your loom. To start, wrap your cotton around the first tooth and tie it securely in place, then run the thread up to the opposite tooth at the top of the loom. Wrap the cotton around this tooth and then run your thread back down to the bottom of the loom. Continue running the thread up and down until you have reached your desired size. I’ve covered my entire loom with warping thread for this project. Tie another knot firmly around the last tooth. Finally, turn your loom 180 degrees so that the bottom (the end with the knots) now sits at the top of your weave.

WeavingStep1

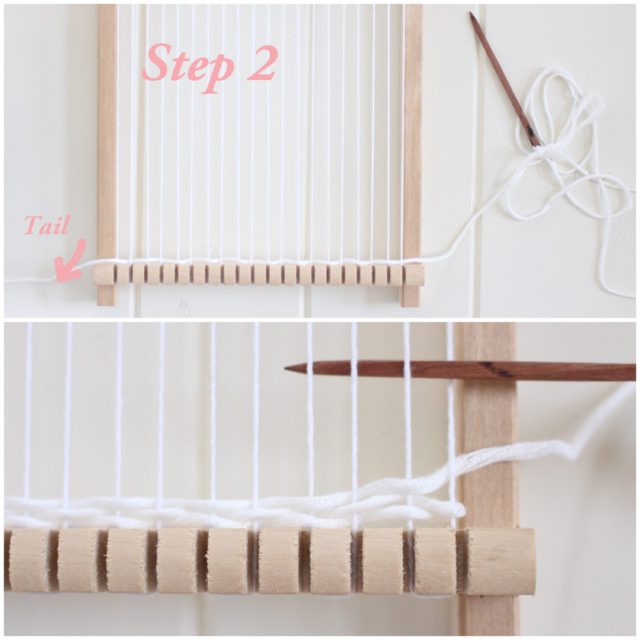
Step 2: Thread your tapestry or weaving needle with yarn and cut off a workable length, as you don’t want to get yourself in a tangle! For larger weaving projects you could use a shuttle; a stick that you can load up with yarn and pass through the warps. I prefer to stick to a needle. The threads that go across are called the weft. Remember to start at the end of the loom without the knots and weave your needle over and under the warp thread until you reach the end, then return back through the warp, alternating over and under. Always leave 2-to-3 inches of tail so that you have enough length to weave in your ends.

WeavingStep2

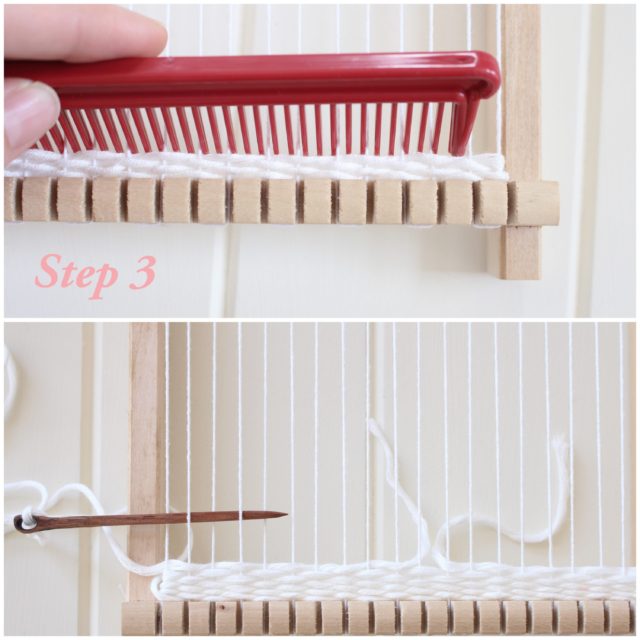
Step 3: When weaving your thread, work a few inches above your previous row, as this will help maintain good tension. Each row of weaving is then pushed down onto the previous row with your wide tooth comb. If you run out of yarn in the middle of a row, simply pull your yarn through to the back, making sure to leave a few inches to stitch in later. Start your new yarn where your last finished and continue.

WeavingStep3

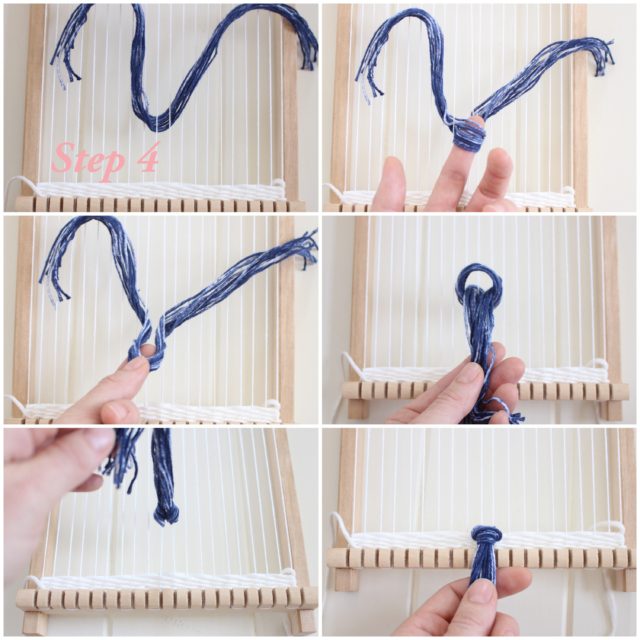
Step 4: After 5 or so rows, you may like to add some tassels to your weave. The number of pieces of yarn required for each tassel depends on the thickness of your thread. As my yarn is quite thin, I’ve used 8 pieces for each tassel. If your yarn is thicker, 8-ply or larger, you may only need 3 or 4 pieces. Don’t make your tassels too bulky as they won’t sit nicely. Layer your threads on top of each other and then weave your threads under 2 warps. Lift the threads up through the warp with your finger to create a small loop. Grab both ends of the tassel and thread them through this loop. Lift up and pull to tighten your tassel and then tug down into position.

WeavingStep4

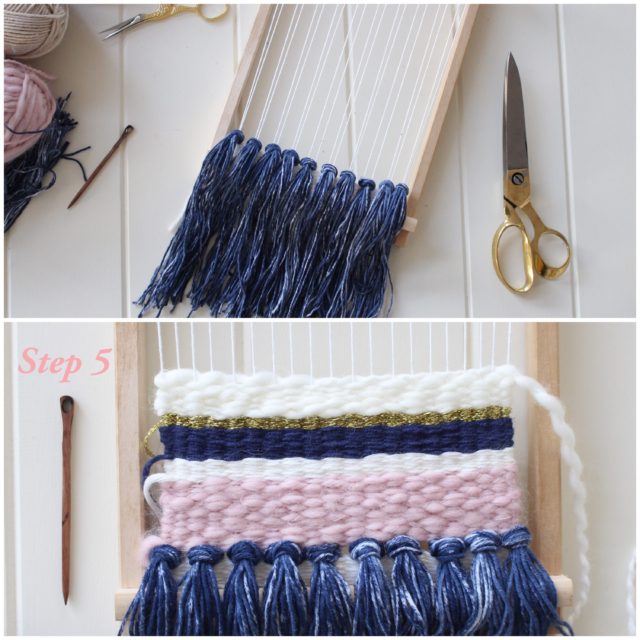
Step 5: I’ve placed tassels all along the bottom of my weave. Continue weaving, changing colours as you go.

WeavingStep5

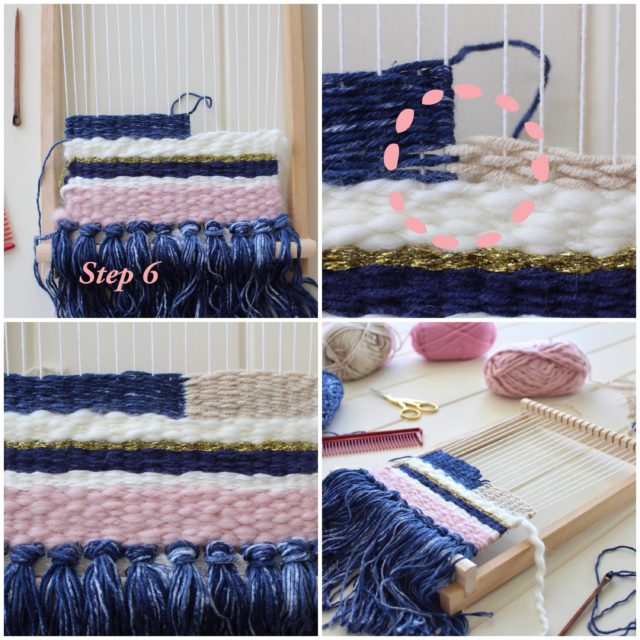
Step 6: If you’d like to add shapes or change colours mid loom, simple weave as normal to the point where you’d like the colour to end. Weave in between the threads of the neighbouring colour (see picture) to keep the weave smooth and connected. Continue weaving, changing colours and adding tassels as you please. Make sure you stop weaving at least a couple of inches before you reach the top, as you’ll need some length in your warp to tie knots when you remove your weave from the loom.

WeavingStep6

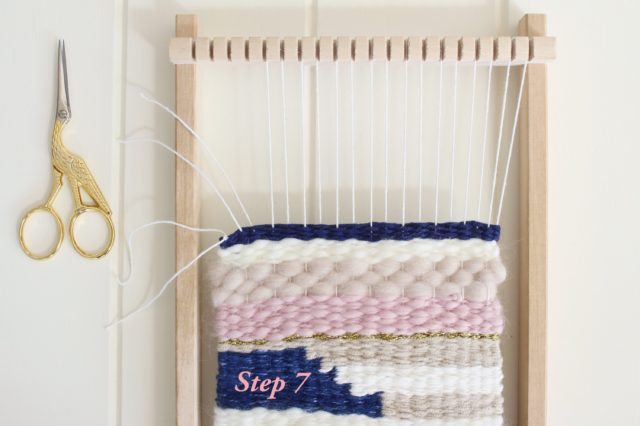
Step 7: Removing your weave from the loom can be a bit scary, but if you follow these instructions, your weave will remain happily intact! Carefully slip your weave off the bottom of the loom — the bottom is where you started weaving, the end without the knots. When the weave is free from the end, push your work gently to the bottom. At the top of the loom, remove the warp from one tooth at a time and cut at the top of the loop, creating 2 threads. Tie these threads together firmly into a knot. Continue removing your warp, one tooth at a time, until all of the threads are knotted. Ta-dah! Your weave is now free.

WeavingStep7

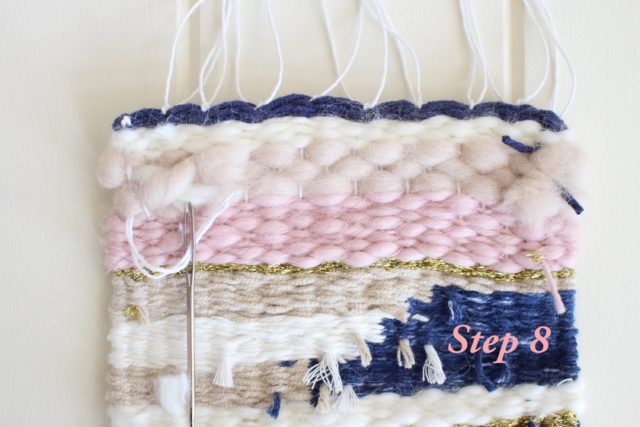
Step 8: Tuck these ends into the back of your weave using your needle. Alternatively, you may like to tie these threads onto your stick or bar for hanging.

WeavingStep8

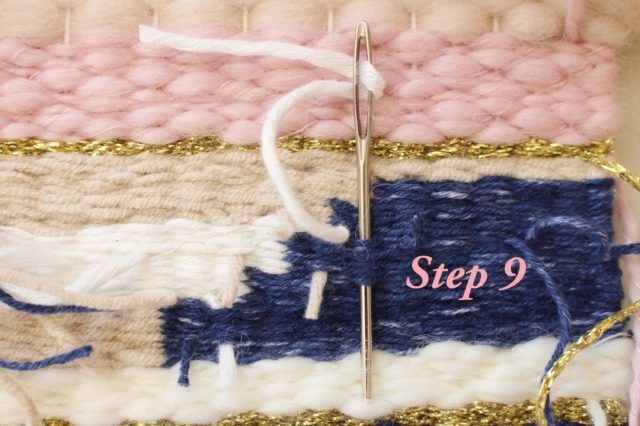
Step 9: Now it’s time to tidy up your loose threads at the back of your weave. Simply thread the dangling yarns into your needle and pass them through about 2cm of weave at the back and snip off the ends to tidy up.

WeavingStep9

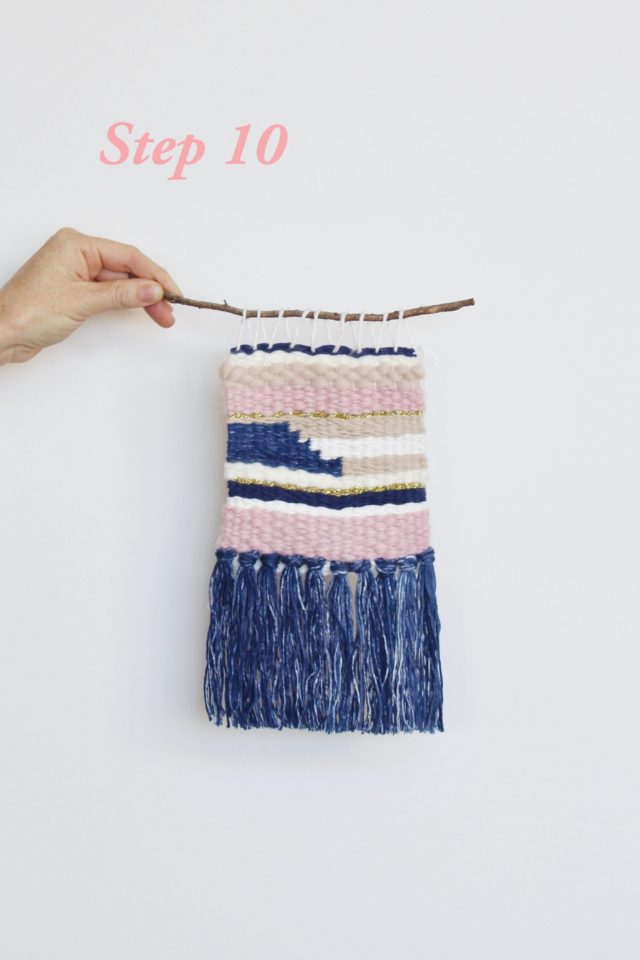
Step 10: How you choose to attach your weave to a hanging mechanism is completely up to you. I’ve loosely stitched mine onto a stick and then attached some string for hanging. Once you’ve attached yours, simply hang and admire!

–Amanda O’Sullivan is country girl with a passion for interiors, craft and design. She is the proud owner of RedAgape Guesthouse in Millthorpe and RedAgape Blog, where she showcases her creative endeavours. We think her Instagram feed is well worth a follow too!

WeavingStep10

So, will you give it a go? We’d love to see your efforts on Instagram! Please tag us if you share them!
FacebookPinEmailTweet

Primary Sidebar

Popular This Week

  • Australian kitchen dimensions: standard sizes for every last detail
  • Palette Cam 15 apps to help you build your dream home
  • AFTER kitchen Before & after: Hunting for George’s latest transformation
  • studio xox Bathroom store specialising in Australian made opens in Sydney
  • We’re loving the 2022 Australian Interior Design Awards winners

Follow us on Instagram

Seb's first go karting ๐ŸŽ Really needs a spot Seb's first go karting ๐ŸŽ 

Really needs a spot on the grid for posterity! @damianfrancis couldn't have gone any faster and Seb loved every second. No fear, all thrill!

Lovely staff at @indy800karttrack near Windsor
Want to try a different tipple this weekend? Toda Want to try a different tipple this weekend?

Today's #iafoodiefriday recipe is a lemon and pink peppercorn spritz by our friends at @thewholefoodsrefillery ๐Ÿธ 

They'll give you 20% off your first order with our code. Find everything you need on the blog now via link in bio.

Cheers! 

#pinkpeppercorn #spritzlife
Those finishing touches make ALL the difference! Those finishing touches make ALL the difference! 

@kethy.australia, whose cabinet hardware I've used in my own kitchen, laundry and on my recent sideboard glow up, are passionate about bringing you the latest design and finishes from around the world!ย 

Their stunning timber knobs and handles from Denmark add texture, warmth and an organic feel to yourย projectsย that can only be achieved by using natural materials.

Whether you're embarking on a new build, renovating an existing kitchen, bathroom or laundry or updating a piece of furniture, Kethy have something for you in their huge range.

See it all online and find your local re-seller at their website via link in @kethy.australia bio.

#timberhandles #timberknobs #cabinethardware #cabinethandles #finishingtouches #drawerpulls #kitchenhandles #kitchenpulls #kitchenknobs #kitchendrawer #kitchendrawers #interiorsaddict #jenbishop #heartyourhome #theinteriorsaddict #homerenovations #interiordesignaustralia #interiordesigninspo #transformyourhome #housemakeover #designinspiration #trusttheprocess #designwork #beautifulhomes #dreamhouse #homestylingsydney #beforeandafterrenovation #creatingbeautifulspaces #kitchentrends2022 #kitchenglowup
Before & after: Renovating a kitchen while keeping Before & after: Renovating a kitchen while keeping ALL the character!

What a great example this is by @huntingforgeorge 

See all the details, and the laundry, on the blog now, via link in bio.
The patient has very much bounced back! Letterbox The patient has very much bounced back!

Letterbox kinder egg deliveries from a friend, dressing changes without a flinch and refusing to nap despite all the bribes (check the face on him in pic 3!).

Thanks for all your care and messages/comments for this tired and shaken up mama! Now very relieved and grateful ๐Ÿ™
Before & after It's not just the award winning de Before & after

It's not just the award winning designer houses that get us excited here. It's also the beloved family homes which are renovated and extended to make them fit for purpose so people can continue to live where they love ๐Ÿค—

@inspiredspacesaus helped her clients with teenage kids transform this house in Sydney's Hills District inside and out, making it their forever home. 

Due to the nature of the block they could only extend sideways and then gave it street appeal with render, new windows and doors.

See inside on the blog now, via link in bio. It was completely overhauled!
Charlie doesn't recommend running head first into Charlie doesn't recommend running head first into tiled steps ๐Ÿค•

Oh what a night. Thankfully Hornsby Hospital were as amazing as always and we avoided stitches. All taped and glued  back together and now to keep him calm for the next few days (๐Ÿคช) and watch for signs of concussion. 

Bravest little patient ever. Yes I've had a ๐Ÿท

Funny how we go into super organised mama mode in times like these. Grabbed dinosaurs, textas and scrapbook on the way out in case we had a long wait!

UPDATE: thanks for all the love! Charlie is so well this morning after a big sleep!
Australian made bathroomware is seriously impressi Australian made bathroomware is seriously impressive!

The new @studio.xox ONLY sells Australian brands. Like @nood_co coloured basins, lead-free eco brass from @faucetstrommen and @lindseywherrett's  ceramic basins made by hand in Tassie.

And as for their Sydney showroom (they also sell online): WOW.

See and read more on the blog now via link in bio.

#interiorsaddict #theinteriorsaddict #jenbishop
#creatingbeautifulspaces #homestylingdesign
#designbywomen #homestylingtips #sydneycreatives
#homestylingsydney #interiorstyling #interiordesignsydney
#everydaydesign #interiortrends #renovationinspiration
#homedesigninspo #lovemyhome #stylingdetails
#loveinteriors #homeimprovements #interiordesignaustralia
#dreamhomeinspiration #homemakeover #personaldesign
#interiordesignaus #creatingbeautifulspaces
#creativehomes #housestyling #sydneyhomes
#interiorinspiration #myhomedesign
I'm THRILLED to be an ambassador for the brand new I'm THRILLED to be an ambassador for the brand new @madeinaustshow in Sydney this August.

๐Ÿฆ˜๐ŸจForget every tacky association you ever had about touristy Australian made and prepare to see a showcase of the best of home, lifestyle, fashion and beauty made right here. If the pandemic has made you appreciate buying local even more, this is for you.

It's the first business to business trade event connecting retailers with Australian made products to champion our local makers๐Ÿ™

Apply to exhibit or find out more at their website, via their bio, now!

Are YOU buying more Australian made post covid?

#madeinaustralia #australianmade #aussiemade #aussiedesign
Follow on Instagram
Visit Jen's profile on Pinterest.

Get Your Free Ebook

Ebook cover

Never miss the latest renovating and interiors products, news and inspo again! Sign up for our newsletter and we'll send you the best bits from the blog, direct to your inbox. Plus you'll get our latest eBook: What Made The Biggest Impact in Jen's Own Reno.
This field is for validation purposes and should be left unchanged.
Avatar

About Guest Poster

If you have high quality, original, relevant content to share, we might be interested in publishing your guest post on Interiors Addict. Please email [email protected] with your submissions.

More from Art

Tiny Giraffe

Brisbane artist creates unique metallic map prints

Win VIP tickets to next week’s Affordable Art Fair Sydney

Travis Barker’s skull-themed homewares available in Australia

Buy original art online this weekend and help flood victims

Candace has personalised the apartment with pops of pink paint

How to personalise your rental home with colour and more

Feels Like Home collection

Limited edition affordable Australian themed art prints

Christmas Finders Keepers market: online this weekend

Urban Road launches three new collections for 2022

Greenhouse Interiors

Greenhouse Interiors’ new art embellished homewares

Reader Interactions

Comments

  1. AvatarAshlea @ Glamour Coastal Living says

    October 8, 2015 at 2:47 pm

    Love this Amanda, so talented x

    Reply
  2. AvatarJo/The Desert Echo says

    March 12, 2016 at 4:31 pm

    Lovely tutorial. Thanks for sharing, can’t wait to try weaving!

    Reply
  3. AvatarSam says

    December 22, 2019 at 5:31 pm

    Lovely tutorial. Busy with my 1st piece. Cant wait to see the end result ?

    Reply
    • AvatarJen Bishop says

      December 27, 2019 at 8:24 am

      Enjoy!

      Reply

Trackbacks

  1. My Weaving Tutorial on The Interiors Addict | RedAgape Style & Design says:
    April 22, 2015 at 11:06 am

    […] i would put together a tutorial. Of course i was thrilled to be asked and the tutorial featured on The Interiors Addict earlier this week. […]

    Reply
  2. Weekly Roundup #2 | prettyofficerkidd says:
    April 24, 2015 at 8:54 pm

    […] “the one”, it’s waaay out of my budget. Well, we’re all in luck – here’s a great tutorial on how to make your own! If you make one, put it up on Instagram and tag me because I wanna […]

    Reply
  3. 43 Inspiration DIY Woven Wall Hangings For Your Home • Cool Crafts says:
    November 16, 2016 at 2:41 am

    […] The Interiors Addict created this cute little yarn weaving to hang on her wall. We love the simplicity and vibrant colors of it! You can create your own by following her full tutorial. […]

    Reply

Leave a Reply Cancel reply

Your email address will not be published. Required fields are marked *

Recipe Rating


Footer

Interiors Addict

Interiors Addict

  • About
  • Contact
  • Work with Jen
  • Press
  • Jobs
  • Privacy Policy
  • Disclosure Policy

Browse

  • RENO ADDICT
  • Jen’s Reno
  • House Tours
  • Real Renos
  • Interviews
  • Styling
  • Designers
  • Bedrooms
  • Covet My Coffee Table
  • Expert Tips
  • The Block
  • Art
  • Furniture
  • Recipes

Follow Us

  • Facebook
  • Instagram
  • Pinterest
  • RENO ADDICT

Copyright © 2011–2022 Addicted Media Pty Ltd
Website care by ClickWP ยท Log in

Share this ArticleLike this article? Email it to a friend!

Email sent!